So if a customer is driving a vehicle that is more than 5 or 6 years old, he may be driving on borrowed time if the timing belt has not been replaced. The risk of belt failure goes up sharply once a belt surpasses its recommended replacement interval, which for most Ford applications (except the Taurus SHO) is 60,000 miles. The recommended replacement interval for the timing belt in the 3.0L and 3.2L V6 Taurus SHO is 100,000 miles and 120,000 miles for Focus.
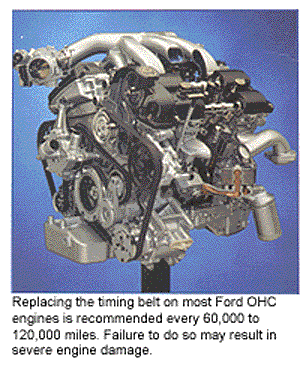
The consequences of a timing belt failure on a Ford depend on the application. Fortunately for many Ford owners, there is enough clearance between the valves and the pistons so no harm will come to the engine if the belt snaps. But on older Escorts (up to 1985) with 1.6L engines as well as 1989 and up Probes with 2.0L or 2.2L four cylinder engines, a timing belt failure will usually bend a bunch of valves. The same goes for the Mazda-built 3.0L V6 in the Mercury Villager. On the older cars, the cost to repair the damage may be more than the vehicle is worth, which means customers must make a painful decision either way.
Your installer customers either know these facts now or they need to. This article can give you valuable insight and information to share with the folks to whom you sell engines.
The main thing to keep in mind about timing belts is that belt failures often happen with no warning whatsoever. As a belt ages, the reinforcing cords that hold the belt together weaken. The belt may still look good as new on the outside but inside the cords have lost tensile strength and may be on the verge of failure.
There is usually no noise or other symptoms to warn a motorist that the timing belt has reached the end of the road. One minute the engine is running fine and the next it is deader than a dodo bird. The only sound they hear is the frustrating wheezes from an engine that cranks but won’t start because it has no compression. If the car is a Probe or an older Escort with an interference engine, the engine won’t even crank because the valves will be smacking up against the pistons.
The rest of Ford’s powerplants rely on timing chains to keep the camshaft and valves moving. This includes everything from the older 289/302/351 pushrod V8s to the latest OHC 4.6L and 5.4L V8s. Chains are longer lived than most timing belts, and there are no recommended chain replacement intervals published by Ford for these engines. Even so, timing chains do stretch with age and may cause noise, retarded valve timing and/or ignition timing. Timing chain noise can also be caused by other problems as well.
CROWN VIC TIMING CHAIN NOISE
A case in point is grinding noise coming from the timing chain cover area in 2000 to 2003 Ford Crown Victoria and Mercury Grand Marquis with the 4.6L V8. According to Ford Technical Service Bulletin 03-15-7, excessive wear in the timing chain tensioner arms can cause a noisy condition. The tension arm has an aluminum base with a nylon surface. So if you find nylon and/or aluminum particles in the engine oil, it probably means the tensioner, tensioner arms, timing chains and gear set all need to be replaced.
The Ford part numbers for the 2000 model year tensioners are F6AZ-6L266-DA (RH) and F6AZ-6L266-CA (LH). For the 2001 to 2003 model years, the tensioner part numbers are 1L3Z-6L266-AA (RH) and XL1Z-6L266-AA (LH). The tension arms are 1L2Z-6L253-AA (RH) 1L2Z-6L253-AA (LH).
Ford also recommends changing the oil and filter to flush any nylon and aluminum particles from the crankcase. If the timing chain has worn through the tensioner arm into the tensioner piston, remove the oil pan from the engine and clean the debris from the oil pickup tube.
FORD CONTOUR TIMING CHAIN CLATTER
Ford TSB 97-2-8 describes a clattering noise at engine start-up after the engine has been sitting overnight that may be heard on 1995 Ford Contour and Mercury Mystique models with a DOHC 2.5L V6. Oil leaking out of the chain tensioners causes the timing chain to momentarily rub against the tensioner ratchet when the engine is first started. The noise only lasts a couple of seconds and goes away as soon as the engine builds up oil pressure.
The cure, says Ford, is to replace the original chain
tensioner components with redesigned parts. These include two timing chain tensioners F5RZ-6L266-CA, the left hand tensioner adapter F5RZ-6C275-BA, the right hand tensioner adapter F5RZ-6C275-AA, the left hand chain tensioner arm F6RZ-6L253-AA and the right hand chain tensioner arm F6RZ-6L253-BA. The two DOHC timing chains and guide assemblies should also be replaced at the same time.
TIMING CHAIN TIPS
When replacing a timing chain on any Ford engine, always
replace the chain, camshaft and crankshaft sprockets. Don’t reuse the old sprockets to save time or money. All three components wear as a system and should be replaced as a matched three-piece set. Some OHC kits also include chain guides and/or tensioners. These "extra" parts play a vital role in supporting the chain and keeping it tight and should also be replaced at the same time.
TIMING BELT REPLACEMENT
Labor times for replacing Ford timing belts obviously vary
depending on the application, but typically run about two hours for the easier ones, and up to three or more hours on the more challenging applications. On a 1984-86 Ford Escort or Tempo with a 2.0L diesel engine (which are very scarce, fortunately), step one of the timing belt replacement procedure is to remove the engine from the vehicle! It’s a six-hour job to change a timing belt on one of these little beasts! Your installer customers should be aware of this.
On a Ford Probe with a 2.0L or 2.2L four-cylinder engine, the job will probably take three to four hours. The biggest obstacle to replacing the timing belt is the right hand (passenger side) motor mount. There is almost no accessibility to a couple of the bolts that attach the mount to engine.
Though Ford hasn’t made the Probe for several years, they are still on the road and many have well over 100,000 miles on the original timing belt. The four-cylinder engines are interference engines so it’s important to change the belt before it fails. So here is the basic procedure for doing just that on a Probe:
- Remove the right front wheel.
- Remove the inner fender panel.
- Remove the accessory drive belts from the engine.
- Support the engine and remove the right motor mount. The two bolts that hold the mount to the engine are recessed in the mount and there is almost no clearance between the mount and inner frame rail. Raising the engine up slightly helps but the job still requires a very short socket and plenty of leverage.
- Remove the six crankshaft pulley bolts and pulley.
- Remove the upper and lower timing belt covers.
- Rotate the crankshaft so the No. 1 piston is at TDC with the timing marks aligned.
- Make sure the No. 1 timing mark on the camshaft sprocket is aligned with mark on the cylinder head.
- Loosen the belt tensioner bolt, push the tensioner away from the belt, temporarily retighten the tensioner bolt to hold it in place, then remove the timing belt.
- It is a good idea to inspect and/or replace the water pump before installing the new belt. Why? Because the service life of the water pump shaft seals and bearings are about the same as the belt. Some water pumps will go 100,000 miles or more without a drip. Others may start to leak at 60,000 miles or less. Replacing the water pump now can save customers the labor cost of having to replace the pump later should it start to leak.
- Replacing the belt tensioner and idler pulleys with new ones is also a good idea, especially if the engine has over 100,000 miles on the original pulleys. If the tensioner and/or idler pulley
bearings are loose or making noise, these parts must be replaced. - Position the new timing belt on the pulleys, make sure all the timing marks are aligned and that the belt is taut between the two sprockets on the non-tensioned side.
- Loosen the tensioner bolt so the spring will pull it tight against the belt. Tighten the tensioner bolt to 27-38 ft.lbs. (37-52 Nm) and check to see that there is about 0.3? (7 to 8 mm) of belt deflection between the crankshaft pulley and the tensioner. You don’t want the belt to be too loose, otherwise it might jump timing; conversely, you don’t want it too tight or it may overload the water pump bearings and shorten the life of the pump.
- Rotate the crankshaft two complete revolutions to make sure the timing marks realign properly.
- Reassemble everything in reverse order, and make sure the crankshaft sprocket baffle is installed with the curved outer lip facing outward (if it faces inward it will rub against the belt).
- Lastly, install a sticker on the timing cover indicating the date and mileage the belt was replaced. This will help the next technician or vehicle owner determine if the belt has ever been replaced, and if so when it was replaced.
TIMING BELT TENSIONERS & IDLER PULLEYS
Tensioner and idler pulley bearings are "sealed for life" and are not serviceable. So there’s no way to clean, inspect or
relubricate the bearings when you change the timing belt. Over time, the grease inside the bearings breaks down and oxidizes, accelerating bearing wear and increasing the risk of a bearing failure or seizure. And the hotter the operating environment, the shorter the lifespan of the grease and the bearings. The location of the tensioner and idler pulley under the timing belt cover prevents them from receiving much cooling, so they tend to run quite hot.
When a tensioner or idler bearing seal fails, dirt and humidity enter the bearing and grease leaks out. The bearing is doomed and will eventually fail. The first symptom is usually noise. If ignored long enough, the next symptom may be jumped timing as the belt loses tension, or belt failure.
If a new tensioner and idler pulley are not included with a timing belt kit, you should order them separately.
TIMING BELT SERVICE TIPS
Any belt that shows obvious damage such as frayed or exposed cords, damaged teeth, hunks of rubber missing, deep cracks, excessive surface cracking or severe glazing should be replaced – without delay! Small surface cracks on the ribbing are considered normal. But extensive cracking or deep cracks are not.
If you find a belt with stripped cogs, it would tell you something in the cam drive system has jammed or stuck, overloading the belt and causing it to shear teeth or jump time. The most likely culprit is the camshaft, which may have seized due to engine overheating or lack of lubrication (low oil level or loss of oil pressure). Check the coolant level, oil level and maintenance records of the vehicle.
When OHC cylinder heads get too hot, they usually swell up in the middle causing the cam to bend or bind. In some cases, this may break the cam, snap the timing belt or shear the cam drive sprocket off the end of the cam. Make sure the replacement belt is identical to the original. Belt length, width, tooth profile and pitch must be the same, and the material must be the same or better. Do not substitute a less expensive neoprene belt for one made of HSN (Highly Saturated Nitrile). Use a quality brand of belt because some no-name brands use inferior materials that won’t last as long as the OEM belt or a quality aftermarket belt.
When changing a belt, never attempt to "stretch" a belt over a pulley. Belts, remember, do not stretch and forcing one to do so will likely damage the cords and cause it to fail.
Also, never pound on a sprocket to force it into place. If it isn’t sliding into place, check alignment and fit.
Misalignment problems in the cam drive can also occur if the cam sprocket is installed backward, the wrong thickness of washer is used (incorrect end play), a thrust button is forgotten or the crank sprocket is not positioned properly on its keyway.
Belt tension is critical to belt longevity. Adjust to the recommended specifications (always refer to the manual because the amount of recommended play can vary depending on the application). If the belt is too tight, it won’t last. If the belt too loose, it may jump time.
Belt replacement is recommended any time the cylinder head has to come off of the engine, or when replacing a water pump that is driven off the timing belt. In both cases, the belt has to be removed anyway to make the other repairs so there’s no extra labor required to change the belt – and it will save your customer the cost of having the belt replaced later on.
REVISED TIMING BELT & TENSION SETUP ON 2.0L
Shop manuals are indispensable tools for looking up disassembly/ installation procedures, specifications, diagnostic and
service information. But sometimes errors occur in printed
manuals, which makes life interesting for the poor guy who
doesn’t know the manual is incorrect. An example here is the timing belt and tensioner setup procedure that Ford originally published for the 1998-2000 Contour, Escort ZX2, 2000 Focus, 1998-2000 Mercury Mystique and 1999-2000 Mercury Cougar with 2.0L engine.
Ford TSB 99-25-4 provides the following corrected information:
To achieve proper timing belt tension on this engine, Ford says the camshaft sprocket bolts should be loosened enough to permit the sprockets to turn freely on the camshafts. Once this has been done, rotate the crankshaft clockwise so cylinder No. 1 is at top dead center. Then, install the camshaft alignment tool in the camshaft slots to hold the cams in place.
- Back out the tensioner bolt four full turns and position the tensioner so the locating tab is at approximately the 4 o’clock position. Line up the hex key slot in the tensioner-adjusting washer with the pointer that is located behind the pulley.
- Working counterclockwise from the crank sprocket, install the timing belt.
- Rotate the tensioner locating tab counterclockwise and insert the locating tab into the slot in the rear timing cover.
- Position the hex key slot in the tensioner-adjusting washer to the 4 o’clock position.
- Tighten the attaching bolt enough to seat the tensioner firmly against the rear timing cover, but still allow the tensioner adjusting washer to be rotated using a 6 mm hex key.
- Using the hex key, rotate the adjusting washer counterclockwise until the notch in the pointer is centered over the index line on the locating tab. (The pointer will move in a clockwise direction during adjustment).
- While holding the adjusting washer in position, torque the attaching bolt to 18 ft.lbs. (25 N.m).
Note: If the pointer does not remain
centered over the index line during final tightening, loosen the bolt and repeat the procedure beginning with step 4.
|
FORD OHC TIMING BELT REPLACEMENT RECOMMENDATIONS
1.3L Aspire – 60,000 miles 1.6L*, 1.8L, 1.9L Escort – 60,000 miles 2.0L diesel (1984-’87) – 60,000 miles 2.0L SOHC Escort & Tracer (1999) – 120,000 miles 2.0L SOHC Focus (2000 & up) – 120,000 miles 2.0L Contour – 60,000 miles 2.0L* Probe (1989-’97)- 60,000 miles 2.0L* DOHC (1999 & up all models) – 120,000 miles 2.0L 4-cyl Ranger pickup – 60,000 miles 2.2L* Probe – 60,000 miles 2.3L 4-cyl Ranger pickup – 60,000 miles 2.3L Mustang & T-Bird – 60,000 miles 2.5L 4-cyl Ranger pickup – 60,000 miles 2.5L V6 Probe – 60,000 miles 3.0L* V6 Mercury Villager (1993) – 60,000 miles 3.0L* V6 Mercury Villager (1994 -2000) – 105,000 miles 3.0L V6 Taurus – 100,000 miles 3.2L V6 Taurus SHO – 100,000 miles (*) – Indicates an interference engine that will suffer valve |

