Now this statement has both good and bad advice in it. Good, because we all know high quality tools cost money, and bad because, as engine builders, who are you going to borrow tools from? The guy next door? Probably not.
You need to have your own tools and tooling to control your quality in every engine job you send out the door. I think we can all agree that tooling is less costly than buying machines, and even if you are buying a new machine, you still need tools and tooling. So what makes a tool the “best” tool versus the “run of the mill” tool?
Of course, you’re looking for quality. Quality in manufacturing, quality in material and, most importantly, quality support from the company that manufactures it or sells it to you. Even if you buy the best tools you can afford, you still need the supplier or manufacturer to be there for you when you need help.
You need them to be able to answer your questions, you need them to be there to take care of any warranty and you need them to be there to take care of you, the customer. Too many times in this business I hear horror stories of this or that company that sold somebody a bill of goods and then dropped the ball after the sale. No support whatsoever. That’s inexcusable, especially in this day and age.
Ok, I’ll get off that bandwagon and get back to what I was going to write about this month: tools and tooling.
Measuring tools are without a doubt the most critical tools in your shop. They must be of high quality and they must be properly calibrated. If they’re not you won’t be able to read a critical dimension correctly and then that engine you just built will be blown up before it gets warmed up.
Micrometers, dial bore gauges, setting fixtures, Ra surface measuring tools, stem height gauges, dial indicators, calipers, run out gauges, hardness testers: all of these tools have to be absolutely spot-on accurate. This is one area you simply cannot compromise. The higher the quality resulting from the higher cost of measuring tools will, in fact pay for themselves over time.
But once you have the best tools your money can buy, you must be able to take care of them. I am going to focus on one of the most popular measuring tools for this article – the micrometer.
Before we even talk about using a micrometer, there are a few things you MUST keep in mind about how to care for it. First and foremost, keep your micrometers clean and lightly oiled. Always store your micrometers in their cases or boxes when not in use. Don’t just toss them on the workbench when you are done.
Never – and I mean never – use any type of abrasive or emery to clean your micrometers. Remind your employees that micrometers are not C-clamps. Be careful to whom you lend your micrometers. Take time every month or so and recalibrate your micrometers to ensure they read accurately.
Now, on to the proper use of a micrometer.
The best way to start is to bring the micrometer close to the range you are going to measure. Do this by rolling the thimble along your hand or arm – do not ever – and I mean never – twirl a micrometer!
When placing the micrometer onto the part, hold it firmly in place with one hand. Close the micrometer using the ratchet until the spindle is nearly on the measured part. This usually can be determined visually. If you hit the part before expected, back off slightly and then slowly and gently close the spindle until the ratchet stop disengages one click.
Note that the procedure requires two hands. If the micrometer is handled with only one hand, the ratchet stop cannot be reached, and reliability will suffer. Some people purchase micrometers without ratchet stops. Don’t be one of them. The micrometer is a contact instrument. That means that there must be positive contact between the part and the instrument. And the amount of contact (all-important feel) is up to the user. When you are attempting to measure 0.001?, repeating the same true reading time after time is almost impossible due to the fact of how much pressure you use each time. Because human beings hand pressure can vary so widely this is a source of serious errors in measurement.
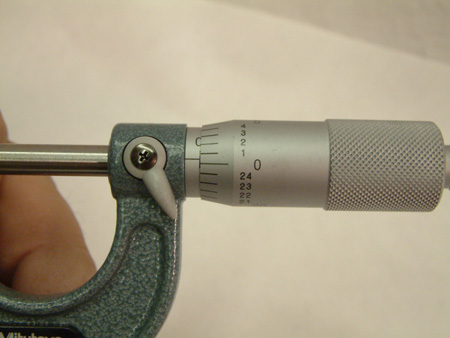
How can you tell if your micrometer is off? Measure something, and note the reading. Measure it again and compare the reading. Do they match? Make a note if they don’t. Next, rotate the thimble all the way down until the spindle makes contact with the anvil. Note the position of the spindle. Is it reading zero to zero? If not then it is time to calibrate. A real indication of whether your micrometer is calibrated or not is to simply measure something of a known size and if you constantly get a different reading, then your micrometer is off and needs calibrating.
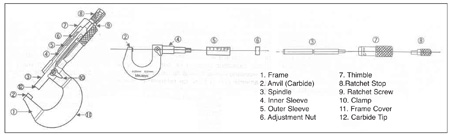
Understanding the various components that make up a micrometer is key to understanding how to calibrate them. Let’s break down the micrometer so we know what all the parts are called and where they are located (see illustration on page 64). Most high quality micrometers come with a spanner wrench and a standard. Find the ones that came with your micrometer or order the standard and spanner from your favorite shop supply company.
How to calibrate your micrometer: All high quality micrometers can and must be calibrated. It is really quite a simple task to perform. First get a micrometer standard for the micrometer you wish to calibrate and follow these steps.
Place the standard between the anvil and the spindle and rotate the spindle until it makes contact with the standard. At this point, all the corresponding lines will line up perfectly if the micrometer is in fact calibrated. If they don’t then take the spanner wrench and move the inner sleeve until it lines up perfectly with the lines. NOTE: A standard is not necessary when calibrating a 0-1? micrometer.
Lock down the adjustment nut securely and repeat rotating the spindle until it makes contact with the anvil. Does it now read zero to zero? If so, you have done well, if not go back through the procedure again until you get it right.
I’ve got one more thing to say. If you’re working on anything metric, measure in metric. Just as you simply can’t use a 5/16? reamer in a 8mm valve guide and you can’t use 1/2? socket on 12mm nut, you can’t expect to use a decimal or fractional micrometer to measure metric dimensions? Sure you can do the math, and yes you can reference your decimal equivalent chart but you really need to step up and buy a metric micrometer or a metric dial bore gauge or metric dial indicators to do it right! Got it? Ok!
See you in the shop!