Many timing belts have different change intervals even in the same car line. The change intervals can be different not only because of engine size, but also due to model year.
The following are helpful tips for timing belt replacement on the VW and Audi 4.2L 8-cylinder engines.
Many timing belts have different change intervals even in the same car line. The change intervals can be different not only because of engine size, but also due to model year.
1. In most Volkswagen 4-, 6- and 8-cylinder cars, the front of the car comes off and what VW calls the lock carrier gets put in service position. The Touareg has plenty of room so that step was not necessary in this particular case.
2. Lift the car and remove the under pan. Carefully vent any pressure in the cooling system. Release the retainers holding the upper radiator hose to the fan assembly. Pull the clip and disconnect the hose from the radiator.
3. Disconnect the electrical connectors, then release the retainers on the sides of the fan assembly and remove the cooling fan assembly.
4. Release the tension on the serpentine belt by turning the tensioner clockwise. If the belt is to be reused, mark the direction of rotation. Our belt looked pretty bad and needed to be replaced.
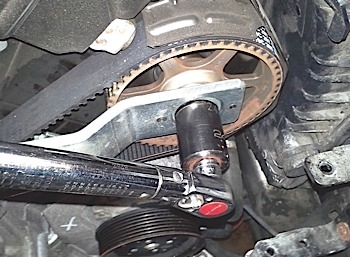
5. Release the clips and remove the left and right upper timing belt covers. Rotate the crank pulley until the mark lines up for top dead center (see Photo 1). The large holes on the camshaft securing plates should be aligned on the inside so the camshaft locating bar 40005 will fit between the two cams. If the large holes are on the outside, rotate the engine 360° and they should line up properly.
[inpost_gallery post_id=4270 group=”1″]
6. Remove the sealing plug from the left side of the block and you should be able to carefully install the crankshaft holding tool 3242 and lock the crankshaft in place.
Remove the center timing belt cover and then remove the eight bolts holding the crank pulley on (see Photo 2).
7. Next, remove the side bolt for the oil filter housing (see Photo 8), followed by the three front bolts that hold the timing belt dampener cover on, and then remove the cover. Slowly depress the dampener until you can install locking pin 40011.
8. With the cams in place and the crank locked in place, you can now loosen the cam gear retaining bolts and remove the gears using puller 40001. Leave the cam adjusting bar in place while pulling the cam gears to prevent the cams from turning. Once you remove the cam adjusting bar, you can remove the belt.
9. The water pump is timing-belt driven, so before you install the new belt, replace the water pump and (Photo 3) also install a new thermostat (Photo 4).
Our timing belt kit came complete with the hydraulic dampener and both rollers. Once those were put in place, the belt was put onto the crankshaft gear first, then the dampener roller, around the tensioner roller, then onto the still loose camshaft gears and finally around the water pump.
10. Reinstall the camshaft adjusting bar. Install a 5 mm drill bit between the tension arm and hydraulic piston. Then, using tool 40009, turn and hold the tensioner in the 1 o’clock position and tighten the bolt to 45 Nm. You can now remove the drill bit and pin from the hydraulic dampener.
11. Lift the tension arm and install a 7 mm drill bit between the tensioning lever and the hydraulic tensioner housing, torque the cam bolts to 55 Nm, (see Photo 5) and remove the cam adjuster bar.
Remove the crankshaft holding tool and install and torque the plug to 30 Nm.
12. Rotate the engine 720° and check that the distance between the top of the hydraulic dampener and the roller arm is about 5 mm. If everything looks good, reinstall the crank pulley.
13. Install the timing belt covers and install the new serpentine belt.
14. Reinstall the cooling fan assembly and skid plate.


