Unfortunately, this four cylinder, pushrod motor didn’t have nearly enough horsepower, so Buick, Oldsmobile and Pontiac all opted for the 1.8L SOHC Opel engine from Brazil for most of their “J” cars, and Chevy promptly made its new engine into a 2.0L/121 cid that delivered more power in 1983.
The 2.0L was upgraded in 1987 with the addition of an aluminum head and crank-triggered spark along with a longer rod and a shorter, lighter piston that reduced noise, vibration and harshness (NVH). GM called it one of its “Generation II” engines.
In 1990, the stroke was increased from 3.15″ to 3.46″ to make the 2.0L into a 2.2L. Since then, the block has been revised four times, and the head has been changed three times.
Beginning in 1994, when the 2.2L became the base engine in the small pickups, there were some more subtle differences, too, so there are a total of seven different long blocks and plenty of opportunities to mess up if you don’t know where to look. With all of that in mind, let’s go back to 1990 when it all began and take a closer look at the 2.2L, piece by piece.
BLOCKS
All of the 2.2L blocks look pretty similar, but there were some significant differences from year to year, so we have identified the blocks that were originally used each year along with the important features that made them unique.

Some of them can be interchanged if they have the right features, but there are usually plenty of cores available. It’s a good idea to stay with the original castings whenever possible to avoid any problems in the field.
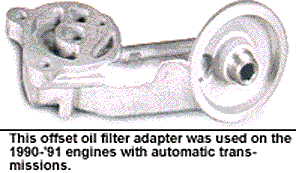
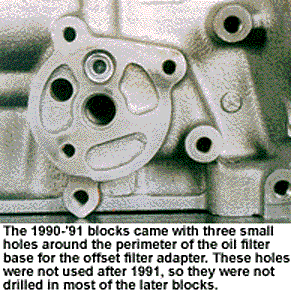
1990-‘91: The original engine used an offset filter adapter for the cars that came with automatic transmissions, so most of the oil filter mounts had three small bolt holes located around the perimeter of the machined oil filter pad.
These blocks were either a 10103566 or a 10068554 casting, but we have seen the 10068554 block without the three holes around the pad.
Rebuilders should use only the drilled blocks for ’90 and ’91 to ensure that the engine fits every application.
Some of the later castings are drilled for the offset adapter, so they can be used for these early FWD applications, too.
1992-‘93: The oil filter screwed directly onto a stud in the middle of the pad for both sticks and automatics in 1992, so the three holes for the offset adapter were no longer drilled and tapped.
The 10156012 and the 10156048 castings were used in ’92 and ’93. The earlier 10068554 casting without the three holes can also be used, but these undrilled, flat tappet blocks were unique to the 1992-‘93 cars so they can’t be used for any other application.
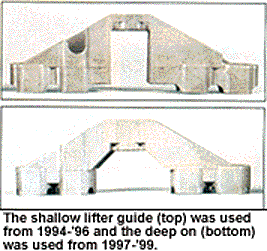
1994-‘95: There were two major changes made to the 2.2L block in 1994. The new “Generation II” engine came with a roller cam, so two of the cast supports that tied the inner and outer walls of the block together on the pushrod side were machined flat about .390″ below the deck surface. They were then drilled and tapped for the bolts that held the two shallow plastic lifter guides (p/n 24575182).
Five more bolt bosses were also added on the block: two on the left and three on the right.
The two big ones on both sides were there for the RWD motor mounts that were needed because the 2.2L Chevy replaced the 2.5L Pontiac as the base engine for the S-10 pickups in ‘94.
Look for a 10215666, a 24575396 or a 10141927 casting. All of these later blocks can be used for the 1990-‘91 FWD cars as long as the three holes for the offset filter adapter are drilled (some are).
They can also be used for all of the 1992-‘93 FWD cars if you are willing to trade a late core for an early one.
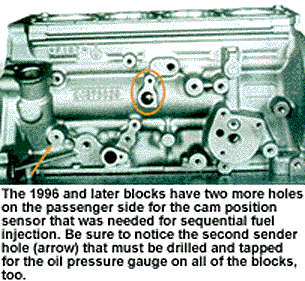
1996: Chevy switched to sequential port fuel injection on the 2.2L in ‘96, so there is a large open hole with a small threaded one beside it on the passenger side for the cam position sensor that was used to sequence the fuel injectors correctly. The 1996 block, c/n 24574521, still had the shallow (0.390″) mounting pads for the early lifter guides, but it can be used up through 1999 as long as the matching lifter guides (p/n 24575182) are provided with the engine.
1997-‘99: The plastic lifter guide (p/n 24575541) was much thicker in the middle beginning in 1997, so the mounting pads in the block were moved down 0.400″.
They were now 0.790″ below the deck surface. This block, c/n 24576035, also has one more small bolt boss on the passenger side, but we have never seen it drilled and tapped, so we have chosen to ignore it for now.
The location of the tang on the #3 main bearing was moved in ’98, too, so rebuilders will have to notch the block or grind off the tang on the earlier aftermarket bearings that are available so they will fit the block.
This casting can be used in a ‘96 car or truck as long as the correct lifter guides are installed in the engine.
CRANKS
There have only been two crank castings used in the 2.2L engines, but one of them comes in two flavors, so it must be visually identified.
1990-‘95: These engines all used the 1237 casting.
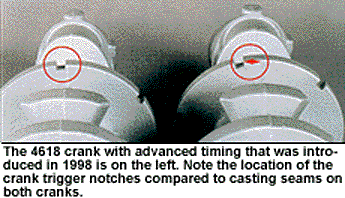
1996-‘97: These engines came with the 4618 casting that is virtually identical to the earlier 1237. They are both interchangeable.
1998-‘99: These engines still used the 4618 casting, but the timing notches were advanced by about 0.450″, so the later crank can’t be interchanged with either of the earlier ones.
It’s easy to tell the difference between the two 4618 cranks when you see them side by side
With both cranks facing you and the keyways at 12 o’clock, note the location of the notch at the top of each reluctor wheel. If the right edge of the notch is about .500″ to the left of the casting seam and located around 11 o’clock, it’s the early, retarded crank.
If the right edge of the notch is right next to the casting seam and nearly straight up at 12 o’clock, it’s the later, advanced crank that came out in 1998. Don’t mix them up, or you will have a comeback.
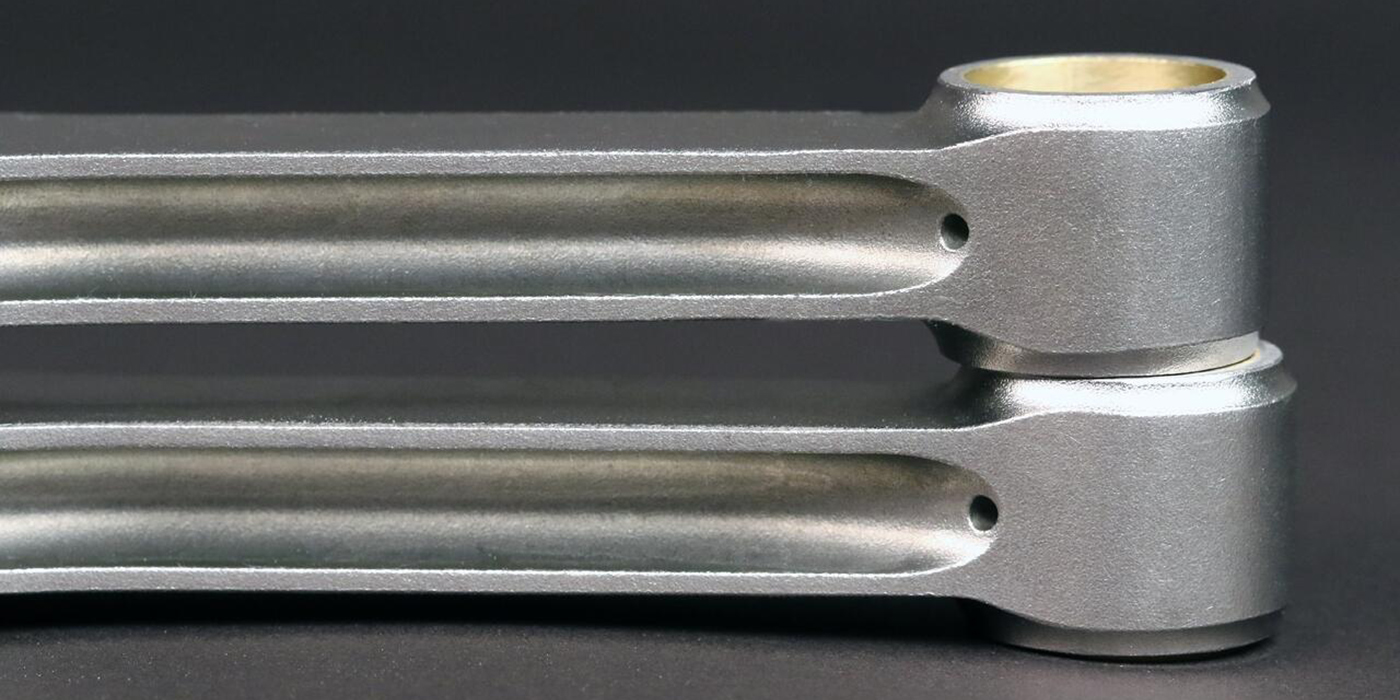
RODS
There have been two rods used in the 2.2L. The original rod that was used in 1990-‘91 was 1.030″ wide at the small end.
It was replaced in 1992 by a narrow rod that measured 0.910″ across the small end.
The distance between the pin bosses was reduced at the same time, so the narrow rod must be used from 1992-‘99.
PISTONS
There have been four different pistons used in this engine:
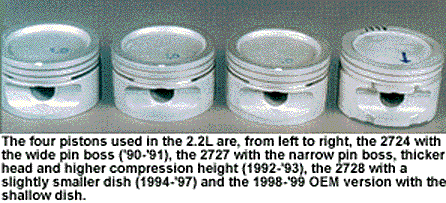
1990-‘91: The original piston was a Mahle 2724. It had the wide pin boss for the wide rod.
1992-‘93: Both the piston and rod were changed in 1992. The pin bosses on the Mahle 2727 were moved 3.0 mm closer together so the small end of the rod was narrowed by about 0.120″.
The compression height was increased by 0.1mm, and the crown of the piston was thicker to accommodate the 15% increase in horsepower.
1994-‘97: The piston was modified again in 1994. The Mahle 2728 had a slightly smaller bowl (19.4 cc vs 21.8 cc) that increased the compression ratio for the new roller cam engine, and it weighed 16 grams less (312 grams vs 328 grams) which helped reduce NVH.
This revised, full round piston was replaced by an even lighter, slipper skirt design in late 1994 or early 1995.
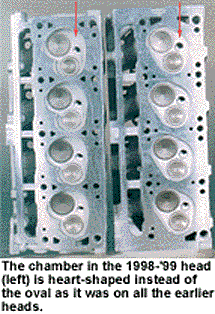
1998-‘99: The 1998 piston had a smaller dish, only .075″ deep, to go with the new heart-shaped chamber.
Oversized pistons are available from GM in +0.50mm (p/n 24577469) and +1.00 mm (p/n24577470).
CAMS
There have been five cams used in the Chevy 134, two flat tappet cams that are interchangeable and three roller cams that are not interchangeable.
1990-‘93: The original flat tappet cam was a p/n 14090095. It was replaced by a p/n 10103699 in 1992.
The specifications for both are very similar, so they can be interchanged in a remanufactured engine.
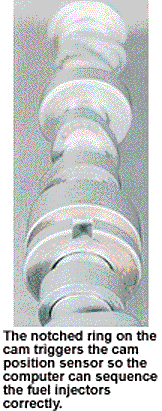
1994-‘95: The “enhanced” engine came with a hollow roller cam that had pressed-on lobes. It’s a p/n 10184912 that can be identified by the numbers “4912” imprinted on the barrel of the cam behind the second lobe.
1996-‘97: The 1996 engine was equipped with sequential fuel injection, so it had a notched ring for the cam position sensor located behind the #3 journal. It’s a p/n 24574570 that has “4570” imprinted on the barrel behind the second lobe.
The specifications stayed the same, so it can be used to replace the 10184912 that came in the 1994-‘95 engines, but the 10184912 can’t be used in the 1996 and ‘97 engines because it doesn’t have the notched ring for the cam position sensor.
1998-‘99: The cam specs were changed substantially in 1998 “to improve midrange torque when combined with the new head and intake manifold,” so this cam can’t be interchanged with any other roller cam. It’s p/n 24574779 that has the notched ring behind the third journal and “4779” imprinted on the barrel behind the second lobe.

HEADS
There have been three different head castings used on the Chevy 2.2L, along with a couple of variations that can cause some confusion. Here’s what you need to look out for:
1990-’91: The original casting for the 2.2L was a carryover from the 1987-’89 2.0L. It was a 10045049 or a 14081738 casting that had an open crossover in the front of the head with threaded holes on both sides.
The purpose of this crossover was always a mystery to us because it wasn’t connected directly to the cooling system. After seeing cores with a pipe nipple in one side and a plug in the other side, and then finding a short passage that angled off to the face of the head on the intake side, we finally realized that it provides heat to the base of the throttle body through a small, rectangular passage in the intake manifold.
Some of these castings had a small 1/8″ x 27 threaded hole over the #1 exhaust port that was used for an “engine metal temp sender” on the 2.0L engines.
Chevy never used this sender with any of the 2.2L engines, so the hole must be plugged if it’s drilled and tapped.
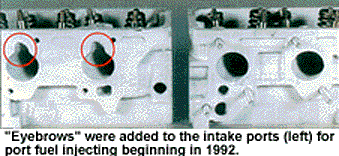
1992-’93: There were a number of changes to the head in 1992. The intake ports were arched on top to make room for the injectors, the intake valves were enlarged from 1.693″ to 1.732″ and conical springs with smaller retainers were used for the first time. Most of the valves in 1992-‘93 heads on them had 8.0 mm stems, but there may be some of these engines with service replacement heads that have 7.0 mm stems.
It really doesn’t matter which one the customer has when you’re selling a long block because the valves are identical otherwise.
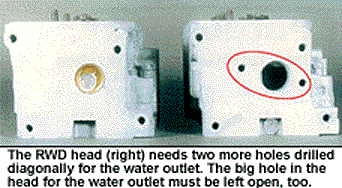
All of these heads were 10112391 castings. The two holes for the crossover passage may or may not be drilled and tapped, but it doesn’t matter because the intake manifold for the port injected engines isn’t heated. However, the big hole in the front of the head for the water outlet should always be plugged because the water outlet housing is on the back of the head on all of the FWD engines.
1994-’97: The same casting that was used in 1992-‘93 was used from 1994-’97, but it had two additional bolt holes drilled diagonally in the front of the head for the RWD water outlet housing and it had 7.0 mm valves. Look for a 10112391 head with an “S” on the end of the casting number. The “S” can stand for three different things, depending on where you look.
The “S” means “standard” on the S-10 pickups, according to the truck microfiche, because all of the truck heads came standard with 7.0 mm stems.
The “J” and “L” cars had a first and second design head from 1993-’97 according to the car microfiche, so the “S” indicates that the head is the “second design” version with 7.0mm valve stems.
The “S” heads were used as replacements for any 1992-’97 vehicle, so the “S” also identifies the later 7.0 mm head as a “service” part according to GM.
Here’s our take on it: We believe that all of the 1992-’93 heads had 8.0 mm stems (we have seen rare exceptions) and that all of the 1994-’97 heads were second design “S” castings with 7.0 mm stems.
Some of the second design heads were used as service replacements on 1992-’93 cars, so the car microfiche spells out the difference between the first and second design heads to make sure the customer gets the right valves when buying them over the counter.
What really matters, though, is that the 10112391S is not a special head for certain applications as some rebuilders have believed. It actually fits all of the 1992-’97 FWD cars plus all of the 1994-’97 RWD applications, as long as the two diagonal holes are drilled in front of the head for the water outlet housing used on the RWD trucks.
Remember that the coolant crossover isn’t used anymore, so the holes don’t have to be drilled and tapped; and, they don’t have to be plugged if they are drilled and tapped.
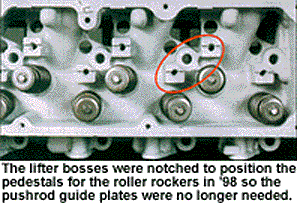
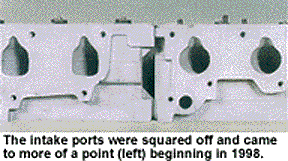
1998-’99: There were several major changes made to the head in 1998. The combustion chambers were heart-shaped, the intake ports were squared-off and came to more of a point at the top, the exhaust ports were noticeably smaller (1.120″) and the rocker pedestals were notched to hold the roller rockers in place. The crossover passage in the front was eliminated, and the EGR passage was revamped. It’s an all new casting (c/n 24575507) that was used up through 1999.
That pretty well covers the castings for these engines for the last 10 years, but there are some other things every rebuilder should know about these engines.
HEAD GASKETS
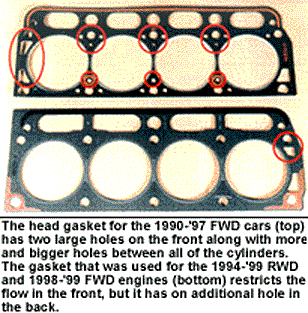
There have been two different head gaskets used on the 2.2L engine. All of the 1990-’97 FWD engines came with the same gasket (p/n 24577218) that was originally used on the 1987-’89 aluminum-headed 2.0L engines.
The RWD engines used another head gasket (p/n 24575420) that restricted the flow of coolant in the front and limited the flow between the cylinders. This gasket directs the majority of the coolant up into the back of the head so it flows forward and cools the entire head before it exits through the front-mounted water outlet.
Beginning in 1998, the FWD engines began using the same head gasket (p/n 24575420) that had been used on the RWD engines since 1994.
This worked well because GM reversed the direction of the coolant in the FWD heads so it flowed in the same direction as it did in the RWD engines. They accomplished this by eliminating the water outlet on the back of the FWD head and installing a long “radiator inlet pipe” that went from the front of the head to the back of the engine where it was connected to the radiator.
PISTON CLEARANCE
The lightweight, short-skirted pistons found in the 2.2L are very prone to rattle if the clearances are too loose. An extra .0005″ will cause problems, so be sure to stay within manufacturer’s recommended clearances when honing the cylinders.
LIFTER GUIDES
There have been two different plastic lifter guides used in the 2.2L engines with roller cams.
1994-’96: The first lifter guides were shallow in the center where they bolted to the block and had two long legs that extended down to hold the lifters in place.
They were bolted onto two machined, cast mounting pads in the block that were located at 0.390″ below the deck surface. This early guide is available under p/n 24575182.
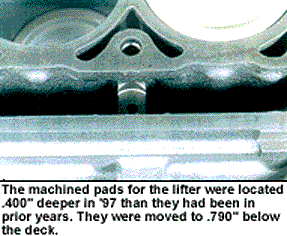
1997-’99: The lifter guide was revised to make it stronger in 1997. It was thicker in the middle and had gussets that supported the two shorter, stiffer legs for the lifters. GM sells this guide as a p/n 24575541.
In order to accommodate this thicker guide, the machined bosses in the block were moved down 0.400″ deeper so they were located at 0.790″ below the deck surface beginning in 1997.
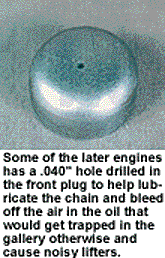
OIL GALLEY PLUGS
Some of the later engines came with a small (.040″) hole drilled in the front cup plug to help lubricate the timing chain and bleed off the air in the oil that would be trapped in the main oil gallery otherwise and cause noisy lifters, especially at startup or during deceleration.
This special plug is available from GM under p/n 14033197. The microfiche now shows it as a replacement for all the 2.2L engines.
TIMING CHAIN TENSIONER
The OEM timing chain tensioner for the 2.2L is rather unique. The chain is tensioned by a bi-metal spring that takes a permanent set the first time it’s heated by hot engine oil. We have seen some aftermarket tensioners that will hold tension as long as the oil is hot, but they relax and lose their tension each time the engine cools off.
This allows the chain to slap on the plastic guides every time the engine is started cold and usually leads to a premature failure of the tensioner and chain. If you have problems with the timing components on this engine, check the tensioner first.
OIL PRESSURE SENDER
Some of the Cavaliers and S-10 pickups came with a real oil pressure gauge in addition to the idiot light, so they had to have two oil pressure senders. The first sender that turns the idiot light on and off also turns the electric fuel pump off in case of an accident. The second sender provides a variable signal to the oil gauge.
Rebuilders will need to drill and tap the hole for the second sender in the flat pad that’s located about three fourths of the way back and midway up the block on the passenger side if it’s not already there. Be sure to center the hole carefully, because the casting will split when the sender or a plug is installed if it’s even slightly off to one side.
HEAD DAMAGE
The aluminum heads for the 2.2L engine hold up pretty good, but about 10% to 15% will need to be pinned or welded because of cracks between the seats.
Another 5% will have severe erosion in the chambers that was caused by detonation. This damage can’t be repaired because the structure of the metal has been altered by the excessive combustion temperatures.
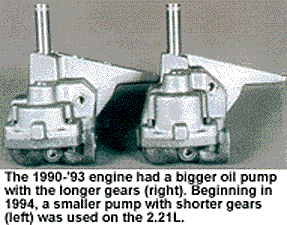
OIL PUMP
There have been two oil pumps used on the 2.2L. The first pump that was used from 1990-’93 came with a deeper housing and longer gears so it pumped more volume than the later, shorter design that was used from 1994 on up. Both pumps are interchangeable, so some rebuilders have standardized on the later pump for everything, even though it has slightly less volume and a lower pressure relief valve (64 lbs. vs 80 lbs.).
CONCLUSION
That’s the story on the 2.2L Chevy. It’s been the base engine in many popular GM cars along with thousands of S-10 pickups over the last 10 years, so there are over 3 million of them out there just waiting for their turn to come to your shop to be remanufactured.