In the last edition of “Machine Maintenance” I challenged you to tell me who introduced the first portable boring bar to the automotive aftermarket. I must admit that I was impressed by the number of responses I received. Here’s the answer: Rottler Manufacturing from Kent, WA.
It seems that the founding father of Rottler was on his way to the U.S. Patent Office in Washington, DC with his new invention when he stopped by a salvage yard to pick up an engine block so that he could completely demonstrate to the patent officer why he should receive a patent. His demonstration was accepted and he was awarded the patent. This boring bar had to be hand fed throughout the boring process and became the foundation of the many variations found in today’s shops.
A big thank you to everyone who responded! You’ll all be receiving a really cool Goodson Racing T-Shirt and hat!
Now, This Month’s Topic:The Flywheel Grinder.
As you know the flywheel grinder should be one of the most profitable machines in your shop. With basic skills, training and the following information, just about anyone in the shop can grind a flywheel properly. The set-up is simple and the job itself is very fast. In most cases you should be able to average about $100 per hour if you can keep the work coming in from your customers.
Here’s a quick overview of how to set up and use your flywheel grinder.
Select The Proper Stone
Check the hardness of the flywheel or material you are going to grind. Not all stones are created equal. Make sure you’re using the correct stone for the material you are grinding – cast steel, billet steel or cast iron.
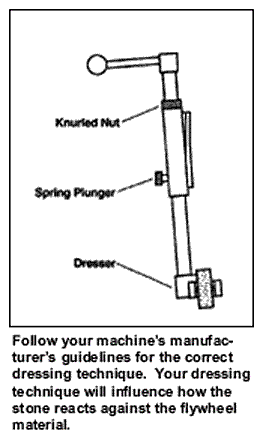
Mount And Dress The Stone Follow your machine’s manufacturer’s guidelines for the correct dressing technique. Some machines come with a diamond while others use a star type dresser. Your dressing technique will influence how the stone reacts against the flywheel material. A fast dress will open the pores of the stone and deliver a rougher finish, and a slow dress will close up the pores delivering a finer finish but with faster grinding ability. You can vary your technique to determine which method is best suited for the flywheel you are grinding.
Don’t forget to check your coolant reservoir and skim the tramp oils on a daily basis, especially during the heat of summer. Your coolant will experience some evaporation. It’s a good idea to mix the coolant in a 5-gallon container with a lid so that as you need additional coolant it will already be mixed.
Three ways you can tell if your coolant needs to be changed are: 1) The coolant is so dirty you can’t see through it; 2) You find yourself dressing the stone more often than normal; and 3) You can feel more than 1? of sludge in the reservoir. If you can, attach a sludge bag to the machine coolant return line. This will continuously filter the coolant.
Another key is to remove the flywheel from the machine before applying any rust preventative. Rust preventative will cause premature coolant contamination.
The recommended pH level for most machines is 8.6.
Mount The Work Piece
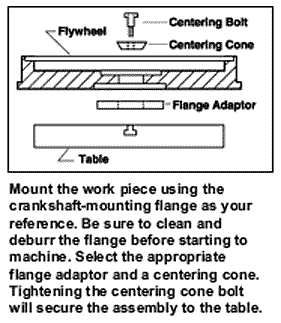
Remove the dowel pins prior to mounting the work piece. Be sure to keep track of the dowel pins and return them to your customer. Mount the work piece using the crankshaft-mounting flange as your reference. Be sure to clean and deburr the flange before starting to machine. Select the appropriate flange adaptor and a centering cone. Tightening the centering cone bolt will secure the assembly to the table.
Ready, Set, Grind
Hand feed the grinding wheel so that it almost touches the work piece. Before beginning, double-check to be sure all the dowel pins are removed. Put on your safety face shield and position the machine’s grinding wheel safety shield and the coolant shroud protective shield.
Next, turn on the coolant, then the table, then the grinding motor. Manually feed the stone into contact with the work piece. Then feed approximately .001? per revolution of the work piece. Grind until you achieve the desired result.
Keep in mind a constant spark pattern is necessary for efficient grinding. This will also cause the stone to break down and keep cutting more freely as well as keeping the stone from loading up.
There will be times that you will need to stop grinding and redress the stone. Be sure to follow the manufacturer’s recommendations for this procedure. Continue grinding until you obtain both the finish and specification required for the flywheel. If you have an auto down-feed machine follow the manufacturer’s recommendations for this feature.
Most manual machines will grind the average flywheel in about 10 to 15 minutes. Larger diesel type flywheels will take longer but you can charge more for those. The average labor charge for a flat flywheel is about $25 to $35. The labor charge for larger diesel flywheels averages $55 to $110.
Make sure all of your machines, including the flywheel grinder, are level, although some manufacturers recommend a slight forward tilt to assist in coolant drainage.
Clean, Clean, Clean.
Due to the nature of the work they perform, these machines are dirty. But you can extend the machine’s life and profitability by wiping down the inside and outside after every job. Additionally, I like to recommend a coat of wax for any painted metal surface. The wax will make the wipe down go much easier. The inside of the coolant shroud also needs to be cleaned and waxed to prevent crud build up. The combination of grinding grit, metal and coolant, or crud, can build up and become like concrete if not removed after every job.
Another important step is to use a deburring stone to knock down any dings or dents that occur on the grinding table when mounting flywheels. This little procedure will increase the accuracy of your flywheel set-up. Inspect all your tooling and adapter rings.
Wire brush the threads of your hold down bolts so they don’t carry debris into the threads of your center-mounting hole. It’s also good idea to periodically replace the center bolt hole thread or run a tap down it to insure the threads stay in good shape. It’s also a good idea to deburr your centering cones and crank flange mounting adaptors and organize your tool board so you can quickly find the necessary tooling for mounting the next flywheel.

Check The Oil Level
Always double-check your instruction and parts manual to be sure you use the recommended type and viscosity of oil for your machine. If your machine is equipped with a filter make sure you change it according to the manufacturer’s recommendations.
Open the back of your machine and find the lead screw. The lead screw needs to be clean and well lubricated. It’s always best to use the type recommended by the manufacturer. There should be a lead screw nut that the lead screw goes through. This nut also needs to be lubricated and may have an adjustment procedure to keep it within the manufacturer’s specifications. Again check with the manufacturer for proper spec on this lead screw nut.
Most machines have guide plates that keep the grinding head in a locked position. This will also need to be adjusted from time to time. A good way to tell if your guide plates need adjustment is to lock the grinding head in position. Try to move the grinding head from left to right; if it moves a minute amount, it’s time to adjust the guide plate.
Also check to make sure the grinding head tilt is what the manufacturer designates and adjust accordingly. Inspect your dresser. Some machines have a star dresser and others have a diamond. Make sure the star is rotating and spins freely. If it doesn’t, it’s time to replace it. For machines that have a diamond, make sure it’s sharp and periodically rotated to ensure even wear. Always replace if in doubt.
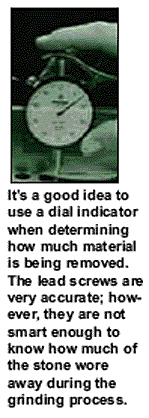
It’s a good idea to use a dial indicator when determining how much material is being removed. The lead screws are very accurate however they are not smart enough to know how much of the stone wore away during the grinding process. Always measure; never guess. It’s even more critical when you are working on a stepped type flywheel. You must ensure you remove the exact amount of material from the pressure plate surface as you do for the clutch disc surface. This will guarantee the original geometry stays intact.
As I said at the beginning, if you take care of your flywheel grinder, it will make money for you for many years. And if and when you do decide to upgrade or replace it for a new machine, it will have a higher resale value.
See you in the shop!