Engine Builders: What does SAE 10W-30 actually mean? We all know to check the owner’s manual to find out which weight oil should be used in the engine of a vehicle, and also generally know to only use motor oils with American Petroleum Institute Certification, designated by the starburst displayed clearly on the container, in most vehicles. But what really is the difference between a SAE 10W-30 and a SAE 10W-40, or for that case, SAE 0W-20 motor oil?
To better understand the numerical code used, a brief explanation is in order. When referencing motor oil weight, you are actually referring to the viscosity grade or the tendency of a liquid to flow slowly or quickly. The Society of Automotive Engineers (SAE) developed a grading system to designate the viscosity level of single grade and multigrade motor oils.
In single grade oils, the lower the number, the better it flows at cold temperatures. Likewise, the higher the number, the thicker the oil. In regard to multigrade oils, the first number in the code, such as "10W" in SAE 10W-30, means that the oil can still be pumped by the engine at a temperature as low as a single grade 10W oil. A "5W", like in SAE 5W-30, can be pumped at an even lower temperature, and a "0W", like in SAE 0W-30, will pump at the lowest tested temperatures. The "W" in the designation is commonly thought to represent Weight, but in fact stands for Winter. The second number, "30," indicates how well the oil will flow when heated to 100°C/212°F or higher.
As engines have become more technologically advanced, engine clearance levels and viscosity grade recommendations may have been reduced, hence the reason your father swore by SAE 20W-50 and your engine calls for SAE 5W-30. If a thicker oil is used in some of today’s high-tech, small clearance engines, oil pressure may increase but the possibility of improper lubrication can result if the oil cannot adequately flow through the engine. Engine manufacturers carefully select the recommended motor oil viscosity grade for each specific engine, which is why the owner’s manual recommended viscosity should always be used.
Engine Builders: The AERA Technical Committee offers the following cylinder head retorque information for 2004-2005 Chrysler 2.4L VIN B, J, X, 1 and 8 engines. This information is provided for those who are attempting to retorque the cylinder head due to slight leakage.
This bulletin applies to vehicles equipped with a 2.4L engine sales code of ED1, ED2 or EDZ built between February 1, 2004 and April 5, 2005 (MDH0405XX). Whenever retor-quing the cylinder head bolt(s), be sure to follow the following torque.
If there are no external signs of damage to any parts, attempt the procedure below before replacing a cylinder head, cylinder head bolts or cylinder head gasket.
If hot, allow engine to reach room temperature.
Remove radiator cap.
Following the appropriate procedures, remove the cylinder head cover.
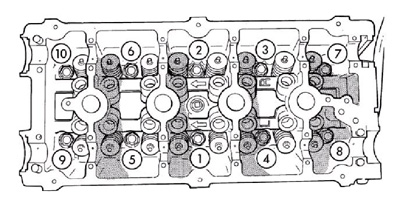
Using a six inch wobble plus extension friction ball (available from Snap-On) and shallow socket following the torque sequence (Figure 1), loosen one bolt at a time and then re-torque the head bolt to 60 ft.lbs.
Repeat step 4 for every head bolt one bolt at a time in the sequence shown below.
Verify that each head bolt is at 60 ft.lbs before performing next steps.
After all head bolts have been verified to be torqued to 60 ft.lbs follow the torque sequence and turn the head bolts an additional 90°(1/4 turn).
Install the cylinder head cover and remaining components and run engine and check for leaks.
Engine Builders: The AERA Technical Committee offers the following information regarding an engine oil leak on 2002-2004 Ford 4.0L VIN E engines. This condition is often thought to be the result of a faulty rear main oil seal.
Some vehicles equipped with this engine that is built in April 2004 or earlier, may exhibit an oil leak from the rear of the engine. The leak may be coming from the oil filter adaptor due to a porosity condition. When the oil filter adaptor leaks, the oil may wick around or follow the ladder frame gasket channel to the rear of the engine. The oil leak may appear to be coming from the rear main oil seal and/or ladder frame gasket area.
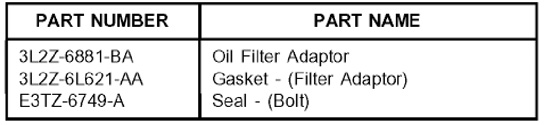
If it is determined the oil filter adaptor is leaking oil: replace adaptor, gasket and mounting bolt. After removing the old adaptor, clean the area and install the required parts listed in the chart above (Chart 1). Follow the steps listed below for proper installation.
Position the new oil filter adaptor and gasket to the cylinder block.
Install a new oil filter mounting bolt seal onto the mounting bolt and hand-tighten the bolt into the engine block.
Torque the adaptor mounting bolt to 42 ft.lbs (57 Nm).
Install new oil filter and fill crankcase with the proper amount of clean engine oil.
Finish assembly of previously removed components and start engine and check for leaks.