The modern “square” design of Holley carburetors was popularly introduced during the late 1950s. Because this style of Holley carburetor featured a simple, modular design with interchangeable parts and a great degree of adjustability, it immediately found favor with performance enthusiasts. We’ll use the Holley 4150-series carburetors to illustrate how to select, assemble, adjust and diagnose most Holley carburetors for non-emissions performance and restoration applications. 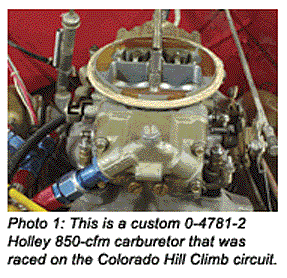
See Photo l.
Before we start, it’s important to know that Holley carburetor “list” or identification numbers are found on the front of the choke tower or immediately behind the throttle linkage on racing carburetors manufactured with no choke towers. Keep in mind that the model number (4150, 4160, etc.) designates the carburetor configuration while the list number designates the actual design application.
Basic Metering Circuits
A Holley carburetor is made with four basic parts, the throttle plate, main body, metering block and float bowl assemblies. As with most domestically produced carburetors, a 4150 Holley has a choke, float, idle, off-idle, accelerator pump, air bleed, main metering and power-enrichment metering circuits.
Whether thermostatically or manually activated, the choke provides mixture enrichment for cold starting and cold driveability performance. Unlike many domestic carburetors, the 4150 Holley float assembly is externally adjustable. The accelerator pump is located under the float bowl and the accelerator pump passage extends through the metering block, main body and to the pump discharge nozzle.
The metering block contains the idle mixture adjustment screws and the idle, emulsion tube, main metering jet and power-enrichment circuits. The off-idle mixture passages, idle speed adjustment and secondary throttle linkage are located on the throttle plate body. The main body contains the idle bleeds, main metering air bleeds, booster venturis and the primary and secondary venturi vacuum ports for versions with vacuum-operated secondary throttle plates.
Selecting the Right CFM
Carburetors are rated in cubic feet per minute (cfm) of airflow at, for example, an intake manifold depression or vacuum of 1.5? Hg. To illustrate, a highly modified 350 cid small block Chevrolet engine that has achieved 100% volumetric efficiency might flow about 700 cfm of air at 7,000 rpm. A classic solid-lifter, “big-block” Chevy, Ford or Chrysler engine might flow about 780 cfm of air at 6,000 rpm.
Stock engines of the ’60s and ’70s normally ran at about 80-90% volumetric efficiency. A well-prepared muscle car engine of the era would operate at nearly 95% volumetric efficiency. A highly modified, naturally aspirated, open-exhaust racing engine might operate at 100% or more volumetric efficiency.
In all of the above cases, installing a larger cfm carburetor won’t increase horsepower because the engine spends 99% of its time operating below “redline” or peak operating speed. Installing a carburetor flowing slightly less than the peak requirements of the engine usually delivers better performance throughout the engine’s power band.
Secondary Applications
The “double-pumper” mechanical secondary throttle configuration uses a larger-volume, 50 cc accelerator pump and a sophisticated pump metering system to keep fuel flowing into the engine as the secondary throttle opens. If the engine can’t achieve enough air velocity through the secondary venturis, a temporary lean-out situation will develop after the accelerator pump stops injecting fuel into the air stream. Consequently, mechanical secondary configurations are recommended only for modified engines in vehicles of, for example, less than 3,400 pounds of weight and with numerical axle gear ratios of 3.90:1 or higher. In contrast, vacuum secondary configurations are recommended for heavier vehicles with mildly modified engines, heavier chassis weights, automatic transmissions and lower numerical axle ratios. A vacuum-operated secondary throttle is, in most cases, more desirable because a constant depression is maintained under the secondary throttle plates as the throttle opens.
The vacuum secondary responds to engine speed and load by receiving a vacuum signal from a small hole drilled into the apex of the primary venturi. See Photo 2.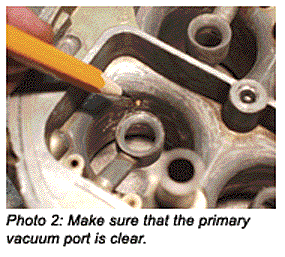
A smaller hole may be also be drilled into the secondary venturi that helps open the secondary throttle plates once air begins to flow through the secondary throttle. Even with this level of engineering sophistication, many performance enthusiasts mistakenly believe that the driver should “feel” the secondary throttle open. Unfortunately, the desired “feel” is usually a momentary lean stumble caused by the secondary fuel metering catching up with secondary airflow.
Vacuum Chamber Assembly
When assembling the vacuum secondary chamber, form the diaphragm into an umbrella-shaped configuration, insert the diaphragm shaft into the lower part of the housing, then clamp the shaft in a vise to allow the chamber cover to be installed. See Photo 3. 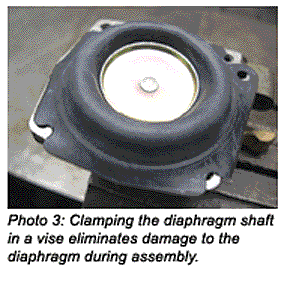 Many vacuum chambers contain a ball check that slows the opening of the secondary throttle. Although some drag racers leave the ball check out to speed up the opening of the secondary, the check ball configuration works well for most applications.
Holley offers a wide assortment of diaphragm springs that allow the secondary throttle opening to occur at different wide-open throttle (WOT) engine speeds. Optional housing covers are available that allow the springs to be changed without disassembling the carburetor. When assembled, the ability of the vacuum chamber to hold vacuum can be easily tested by depressing the diaphragm rod and then covering the vacuum port.
When testing, the secondary throttle shouldn’t open by merely “dry-revving” the engine in the shop. A better way to bench-test the vacuum secondary is to blow compressed air past the secondary vacuum port located in the primary venturi at WOT. The secondary throttle should open smoothly to a vertical position. Vacuum chamber operation can be tested on the vehicle by slipping a paper clip onto the diaphragm shaft and pushing it against the lower vacuum chamber housing. During a high-rpm acceleration test, the paper clip should be pulled down the length of the shaft when the secondary throttle opens. Last, Holley incorporates a throttle stop screw on the secondary throttle that prevents the throttle plates from sticking in the throttle bores. To adjust, turn the screw in until the screw firmly engages the secondary throttle stop.
Adjusting The Accelerator Pump
The accelerator pump is operated by a lever that follows a plastic cam located on the throttle shaft. The accelerator pump discharge volume can be increased, changing the location of the mounting screw from #1 to #2 position. See Photo 4.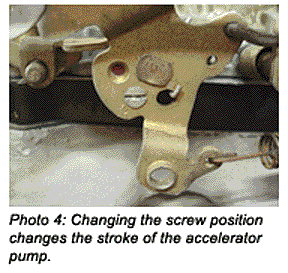
Accelerator pump cams on some carburetors might have three positions and adjust in the same manner. The pump lever spring travel must also be adjusted to allow .015? of clearance to exist between the pump spring adjusting screw and the pump diaphragm arm at WOT.
Holley also supplies a wide range of accelerator pump cam profiles that allow the pump discharge rate to be tailored to the engine. If the pump is initially adjusted to specification and a slight hesitation is noted during throttle tip-off, a slightly higher profile cam might be required. In addition, the pump discharge rate can be increased or decreased by changing the orifice size of the pump nozzle. Usually one step larger or smaller (.003?) will indicate if the discharge rate can be improved.
Adjusting The Power Valve
The power valve numbering system indicates the level of intake manifold needed to close the power enrichment circuit. A #65 power valve, for example, will close at 6.5? Hg of intake manifold vacuum.
Although most 4150 carburetors use power valves ranging from #65 to #85, a “lighter” power valve (#45 or #55) might be required at extremely high altitudes or with highly modified engines that achieve relatively little intake manifold vacuum.
In general, if the power valve remains closed too late, a slight hesitation will be noticed during acceleration. If the power valve opens too soon, the engine will run rich during low-speed, part-throttle operating conditions. In most cases, the specified power valve should be used. Otherwise, the vacuum rating of the power valve should be one-half of the idle-speed vacuum reading. Automatic transmission readings should be taken with the engine idling and the transmission in gear.
Last, only Holley high fuel-volume, shielded-diaphragm configurations should be used in performance applications. The rectangular fuel outlet slots identify the high-volume power valve. The shielded valve reduces the probability of diaphragm damage from an engine backfire.
Adjusting The Float Level
When installing the adjustable float needle and seat assembly, always lubricate the assembly O-rings with engine oil and make sure that the float bowl bore is free of rust and scale. The initial float level is adjusted by holding the bowl upside down and adjusting the float needle until the float sits parallel with the top of the bowl. See Photo 5.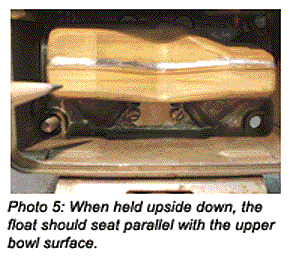
The sight hole in the side of the float bowl should be used for the final float adjustment. With the vehicle on a level shop floor, the correct float level is achieved when a few drops of fuel overflow the sight plug when the chassis is bumped. For fine-tuning, remember that one flat of the adjusting nut equals about 1/32? to 1/16? of fuel level.
Although the needle assemblies are manufactured in various diameters and materials, the .120? steel diameters are primarily intended for methanol racing fuels. The .110” diameter seat with a resilient tip is adequate for most 4150 models. Because float level and operation is very dependent upon fuel pressure, Holley supplies a very reliable adjustable fuel pressure regulator to meet the needs of its carburetors. The regulator should be adjusted using an accurate fuel pressure gauge with the engine running.
Fuel pressure should be regulated to between 5 and 6 psi for normal driving. Off-roading might require 4 psi while full-bore drag racing might require 6-8 psi. Too much fuel pressure tends to make the carb run rich at low speeds, while too little fuel pressure might cause the carb to run lean during high engine speeds and loads.
Holley mechanical and electric fuel pumps are designed to deliver the pressure and volume needed for performance use. Remember that an electric pump should be installed with the proper key-on, engine off, safety shut-off devices in place.
Carburetor Main Jets
Holley jets are numbered according to fuel flow. As a rule of thumb, 600 cfm series units use 60-series jets, 700 cfm series use 70-series jets and 800 cfm series use 80- series jets. Jetting for a classic 0-3310-1 780-cfm Holley carburetor, for example, is #72 for the primary venturi and #76 for the larger secondary venturi. The nearly identical 0-3310-2 uses a 134-21 metering plate in the secondary throttle, which means that the plate has a.040? idle feed and a .081? main metering restriction.
Original jetting configurations for specific list numbers are available at www.holley.com/TechService. Keep in mind that a mechanical carburetor doesn’t correct for barometric pressure, ambient air temperature and atmospheric humidity. While stock jetting is adequate for most applications, the main metering can be adjusted by increasing or decreasing the jet size in two-step increments. In general, reduce one jet size per 2,000 ft. increase in altitude and one jet size per 10° F increase in ambient air temperature. On carbs with secondary metering plates, change the main metering restriction first.
Before determining the need for re-jetting any carburetor, always clean the primary and secondary air bleed jets first by using a light aerosol penetrant like WD-40. If a solvent is used, clean thoroughly and follow up with a penetrant. Next, make sure that the float level, fuel pressure and fuel pump volume are to specification. Last, if the carburetor cfm matches the requirements of the engine, jetting changes should seldom exceed three to four steps at sea level. The only exceptions to this general rule are racing engines using a lot of camshaft timing and running with a tuned open exhaust.
Diagnosing Holley Performance Issues
In general, most Holley carburetors may run rich due to an O-ring failure on the needle and seat assembly, a ruptured power valve or a failure of the main metering block gasket to seal correctly. If the float level adjustment doesn’t respond, the fuel pressure is excessive, the needle assembly O-ring isn’t sealing or the float needle isn’t seating correctly due to dirt contamination.
In most cases, the idle mixture should be close if the idle mixture screws are lightly seated and then backed out 1 to 1-1/2 turns. If the idle mixture is rich with the idle screws turned in, the power valve diaphragm might be leaking fuel into the air stream. If the engine seems to have idle mixture adjustment or mid-range fuel metering problems, the metering block gasket might be cracked or the main metering body gasket surface might be warped. For best sealing results, use the “blue” Holley metering and float bowl gaskets and don’t over-tighten the mounting screws.
Assembly Tips
At the outset, the most common amateur mistake is to over-tighten the float bowl screws. Consequently, it’s important to check the main metering body for warpage when disassembled. A warped main body surface won’t allow the metering block to compress the metering block gasket evenly.
Mild cases of warpage around the mounting screw threads can be corrected by carefully filing the surface flat. See Photo 6.
More serious warpage might be corrected by tapping the corners of the main body surface down with a light hammer and then filing flat. This is a risky procedure, but the less attractive option is to replace the main body. When assembling the float bowl and metering block to the main body, always use snug the float bowl screws in an incremental and diagonal pattern until the gasket is seated. Remember also that the accelerator pump nozzle retaining screws also deserve a light touch because the threads in the metering body are grooved to allow fuel to flow around the nozzle retaining screw.
If the carburetor is installed on an open-plenum intake manifold, an aluminum four-hole “screw plate” should be installed under the carburetor to prevent loose throttle body screws from accidentally dropping into the engine. A similar 1/4? insulator gasket will also serve this purpose. Last, over-tightening the carb to the manifold mounting studs can break the throttle body casting at the accelerator pump arm pivot. A nut driver is the perfect tool for tightening Holley mounting nuts.
A Word About Custom Carbs
Many aftermarket companies specialize in customizing Holley carburetors to meet the exact requirements of any specified engine. Holley also provides 4150-series carburetors with adjustable air bleed and emulsion systems. Because these carburetors feature adjustable air bleed and emulsion tube systems, the initial setup must be accomplished by testing the carburetor on an engine dynamometer. Consequently, tuning of these types of carburetors is best left to professionals who have the data needed to achieve the “fuel curves” needed for maximum engine performance.