An installer or vehicle owner may complain about a chirp coming from the lower timing
belt area. The noise is most often noticed at idle, usually after the
engine has warmed up. The probable cause is that the idler pulley
mounting surface is tilted, causing the edge of the timing belt to rub
against the side of the pulser flange on the drive pulley (gear). To
correct the condition, install a taper shim kit, and grind a deeper
relief on the engine mount bracket, if needed.
Engines: 2005-’07 J35 V6 engine found in Accord, Odyssey, Pilot and Ridgeline.
Parts Information:
Description Part Numbers
Taper Shim Kit 2005 models: P/N 04148-RCA-305
2006-’07 models: P/N 04148-RCA-306(contains taper shim, timing belt and
timing belt drive pulley [gear])
Water Pump 2007 Accord V6 only: P/N 19200-RDM-A02
Diagnosis:
1. Remove the drive belt.
2. Start the engine.
Do you still hear the noise?
YES – Go to Repair Procedure.
NO – Reinstall the drive belt, then continue with normal troubleshooting procedures.
Repair Procedure:
Note: On certain 2007 Accord V6 vehicles, you will also be
replacing the water pump. All other non-water pump replacement steps
apply to all affected vehicles.
1. Affected 2007 Accord V6 only: Drain the engine coolant into a clean container, and save it for reuse.
2. Set the engine to TDC (top dead center).
3. Remove the crankshaft pulley.
4. Remove the timing belt covers.
5. Unbolt the CKP (crankshaft position) sensor (if applicable), and set it aside. Do not disconnect the CKP harness connector.
6. Remove the timing belt.
7. Affected 2007 Accord V6 only: Remove the timing belt adjuster.
8. Affected 2007 Accord V6 only: Remove the water pump.
9. Remove the engine mount bracket.
10. Remove the timing belt idler pulley.
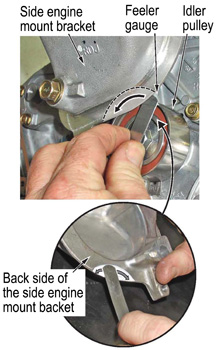
11. Try to insert a 0.95 mm feeler gauge between the top edge of the
timing belt idler pulley and the back of the side engine mount bracket
overhanging the pulley (Figure 1).
• If you can insert the feeler gauge, go to step 13.
• If you can’t insert the feeler gauge, go to step 12.
Note: Remove the feeler gauge from its holder to get a more accurate measurement.
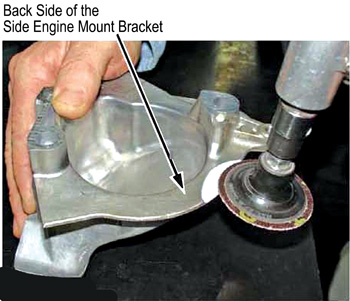
12. Use a die grinder with a 2?, 50 grit grinding disc (or equivalent)
to remove material for clearance on the side engine mount bracket. Use
the engine mount bracket circular casting offset as a guide for
grinding until the lip measures 2 mm thick with a caliper or micrometer
(Figure 2).
13. Affected 2007 Accord V6 only: Replace the water pump, and reuse the coolant you removed in step 1.
14. Affected 2007 Accord V6 only: Reinstall the timing belt adjuster.
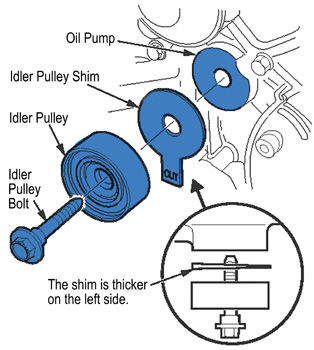
15. Place the idler pulley shim between the idler pulley and the oil pump housing, and loosely install the idler pulley bolt (Figure 3)
with Hondalock 1 or equivalent thread-locking compound (P/N 08713-0001)
applied to its threads. Be sure to follow the use instructions on the
container of the thread-locking compound.
Note: The shim tapers from left to right. The word “OUT” is
painted in white and stamped into the tang of the shim, and should be
readable when the shim is installed.
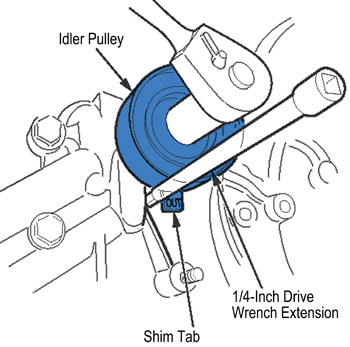
16. When tightening the idler pulley bolt, use the square end of a 1/4?
drive ratchet extension to keep the shim’s tab in the correct position.
After you tighten the idler pulley bolt to 33 ft.lbs. (44 Nm), bend the
shim’s tab slightly toward the oil pump housing to keep it away from
the idler pulley (see Figure 4).
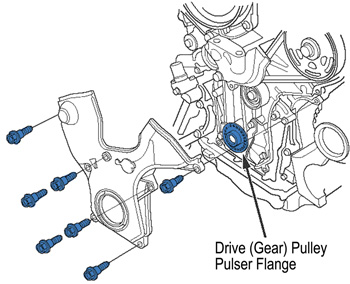
17. Install a new timing belt drive (gear) pulley (see Figure 5).
18. Install a new timing belt.
19. Reinstall the CKP sensor (if applicable), and torque its bolt to 7.2 ft.lbs. (9.8 Nm.)
20. Reassemble the remaining parts using the appropriate service manual
procedures. If you replaced the water pump, make sure you bleed any air
from the cooling system after refilling with the coolant you drained in
step 1.
21. Test-drive the vehicle to verify the repair (if applicable).
– Tech Tip courtesy of ALLDATA