Most installers should know the first symptoms of a head gasket that is failing are usually a slow
loss of coolant with no visible leaks, engine overheating and/or a
Check Engine light with cylinder misfire codes. The Onboard Diagnostic
II (OBD II) system should detect any misfires that occur due to a loss
of compression or spark plugs fouled by coolant seeping into a
combustion chamber. So if you find a cylinder misfire code, check the
spark plug for coolant fouling, and do a compression or leak-down test
on the cylinder to find out what’s going on. Internal coolant leaks
caused by a leaky head gasket can usually be diagnosed by pressure
testing the cooling system.
Regardless
of the cause, a head gasket failure is bad news for the vehicle owner
because it will require replacing the head gasket, or if it is a warranty situation for one of your engines, you’ll get to do it again. Depending on the
application and how much labor it requires, installing a new head
gasket can easily cost up to $1,500 or more. And if coolant has diluted
the oil and damaged the bearings inside the engine, your customer could
be looking at a considerably higher repair bill.
What Happened?
Many motorists are puzzled by head gasket failures because they don’t
understand the causes of gasket failure. Regular maintenance and oil
changes can’t prevent a high-mileage head gasket from failing, but it
can increase the odds of detecting other problems that may lead to
premature head gasket failure.
For instance, one reason head gaskets fail is because of engine
overheating. If the engine gets too hot, the cylinder head can swell to
the point where it crushes the head gasket (usually between the
cylinders because this is the thinnest point). The extruded material
and/or cracked combustion armor then provides a leak path for coolant
and/or combustion gases.
Replacing the head gasket will cure the leak, but the underlying cause
that made the engine overheat in the first place also needs to be
diagnosed and repaired — otherwise, the newly installed gasket will
suffer the same fate the next time the engine overheats.
The
cooling system on many late-model imports is just barely adequate (to
reduce weight and cost), so it doesn’t take much loss of cooling to
make the engine run hot and overheat. A low coolant level, a dirty
cooling system, a cooling fan that isn’t working correctly, or
overloading or overworking the vehicle can all be contributing factors.
On 1998 to 2000 Volvo S40 models with the 1.9L turbo engine, the engine
cooling fan resistor may fail, preventing the cooling fan from working.
This may cause the engine to overheat at low vehicle speeds, resulting
in head gasket damage if the engine gets really hot. Replacing the head
gasket will fix the coolant leak, but it’s important to make sure the
cooling fan is working correctly and comes on when needed so the engine
does not overheat again. The fan resistor is located under the front
engine splashguard, just below the fan motor. A new resistor (P/N
30644121) can be spliced into the wiring if the original resistor is
defective.
If a head gasket has failed because of overheating, be sure to check
the coolant level and condition; the concentration of antifreeze in the
coolant (too much antifreeze in relation to water reduces the ability
to transfer heat); and the radiator (obstructions, leaks, etc.), hoses,
thermostat, water pump, cooling fan, EGR system, belts and the exhaust
system to determine why the engine overheated. In some cases, an
exhaust restriction (clogged converter) can also make an engine run hot.
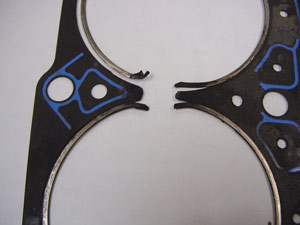
How can you tell if overheating caused the head gasket to fail? A head
gasket that failed because of overheating or a hot spot will be crushed
and measurably thinner in the damaged area when checked with a
micrometer. By comparison, a gasket that has failed due to detonation
or pre-ignition will usually have cracked armor around the combustion
chamber, which leads to burn-through.
Detonation Damage
Another reason head gaskets fail is because of damage caused by
detonation (spark knock). Detonation causes a sharp spike in combustion
chamber pressure, which, over time, can overload and crack the gasket
armor that surrounds the cylinder. This leads to burn through and loss
of compression.
Detonation
can be caused by a variety of problems. One is an accumulation of
carbon in the combustion chamber that increases compression. Many
late-model import engines run fairly high compression ratios, and some
require premium octane fuel. If compression reaches a point where the
fuel ignites spontaneously before the spark can set it off, the engine
will knock and ping under load.
Mislabeled fuel that does not have the octane rating claimed on the
pump can also lead to trouble in high-compression or turbocharged
engines, especially when the engine is working hard under load or high
boost pressure. If there aren’t enough octane-boosting additives in the
fuel, the engine may experience mild to severe detonation.
Other factors that may increase the risk of detonation include an EGR
system that isn’t working (by diluting the air/fuel mixture slightly
with exhaust, EGR actually helps cool combustion temperatures under
load). Over-advanced ignition timing can also cause detonation, as can
an overly lean air/fuel mixture. Any problems in the cooling system
that make the engine run hotter than normal will also increase the
chance that detonation may occur.
Pre-ignition is a related problem that can also cause detonation.
Pre-ignition occurs when a surface inside the combustion chamber gets
so hot that it becomes a source of ignition instead of spark. The hot
spot might be the exhaust valve, spark plug or a sharp edge in the
combustion chamber.
The underlying cause is often an overly lean air/fuel mixture or a
cooling problem. If pre-ignition occurs, it will ignite the air/fuel
mixture before the spark plug fires, causing combustion pressure to
peak too early on the compression stroke. This, in turn, can cause
detonation that may damage the head gasket.
Weak Gasket Design
Another reason why head gaskets fail is because the original OEM gasket
design is not robust enough to go the distance. Vehicle manufacturers
subject their engines to extensive durability testing, but sometimes a
weak head gasket design isn’t discovered until an engine has been in
service for a number of years. If the head gasket fails while the
engine is still under warranty, it becomes a warranty expense for the
vehicle manufacturer. But, in most cases, head gaskets don’t fail until
the engine is out of warranty and has a lot of miles on it.
Subaru
has had head gasket problems on some of its 1996-’99 Outback, Legacy
GT, Forester and Impreza RS models with the 2.5L engine. In 1996,
Subaru used a composite head gasket on these engines, and then changed
to a stronger multi-layer steel (MLS) gasket with a graphite overlay in
1999. Even so, some of these head gaskets develop leaks that allow
coolant and oil to mix. Symptoms include engine overheating due to loss
of coolant, and an oily residue in the coolant overflow bottle. The fix
is to replace the head gasket.
Subaru has also had some head gasket leakage problems on 1998 Impreza,
and 2000 and newer Outback and Legacy models with 2.2L and 2.5L
engines. The problem occurs on the left side of the engine and is
usually an external oil and/or coolant leak. The cause may be battery
corrosion (the battery is located above the left side of the engine)
that attacks the outer edge of the head gasket.
If you end up replacing the head gasket, don’t reuse the original head
bolts because they are torque-to-yield (TTY) bolts. TTY head bolts
stretch when tightened and should not be reused because they may break
or fail to maintain torque.
Some head gasket failures can be blamed on the design of the cylinder
head and the way it loads the gasket. The 1988-’95 Toyota 3VZE 3.0L V6
light truck engine, and 1995-’98 Toyota 5VZFE 3.4L V6 in T100s, Tacomas
and 4Runners are all examples of engines with hard-to-seal heads and
frequent head gasket failures.
In the case of the Mitsubishi 3.0L V6, the armor around the combustion
chambers on the OEM gasket has a tendency to crack. The cracking occurs
as a result of metal fatigue caused by the head scrubbing back and
forth on the block because the engine has aluminum heads and a
cast-iron block. Aluminum expands at a much higher rate than cast iron,
which causes the head surface to move more than the block surface. If
the head gasket can’t accommodate the movement, or lacks any built-in
lubricity (such as a non-stick coating), thermal expansion and
contraction can literally tear the head gasket apart as the miles
accumulate. The fix is to replace the OEM head gasket with an improved
and redesigned aftermarket head gasket that has stronger combustion
armor, better materials and an anti-friction coating that can handle
the movement.
On older Toyota 3.0L and 3.4L engines, excessive head motion is also a
leading cause of gasket failure. Installing a redesigned aftermarket
gasket with improved combustion armor and an anti-stick coating should
provide a long-lasting fix.
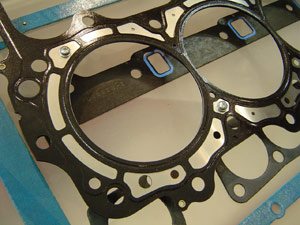
Some aftermarket gasket suppliers now offer MLS replacement head
gaskets for older import engines that were originally equipped with
composite or graphite head gaskets. The MLS head gaskets are made of
several layers of embossed stainless steel and are much stronger than
the OEM gaskets that were originally used.
Gasket Replacement Tips
Replacing a head gasket is a big job for many installers and vehicle owners, so here are some tips to help avoid making any mistakes that could prevent the gasket from sealing properly and the engine coming back to you.
• After removing the old head gasket, carefully remove any residue from
the head and block using a gasket removal chemical and scraper. Do not
use an abrasive pad in a drill to whiz off or clean the head or block
surfaces because doing so may also remove metal and create shallow
depressions that can prevent a new head gasket from sealing.
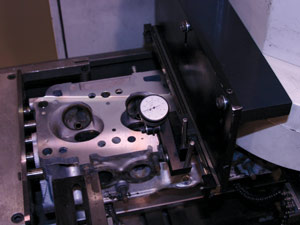
• Before you install a new head gasket, use a straight edge and feeler
gauge to carefully check the flatness of both the cylinder head and the
engine block. If flatness is not within specifications, the head or
block will have to be resurfaced. For engines with aluminum heads,
flatness should be 0.002 in. (0.05 mm) in all directions.
• If the head and/or block are resurfaced, the surface finish must be
to specifications. MLS head gaskets typically require a much smoother
finish (20 micro-inches or less) than composite head gaskets (which can
handle up to 50 micro-inches or more).
• Do not use any type of sealer on a head gasket unless the
installation instructions that come with the gasket specifically say a
sealer is required. If so, use the type of sealer specified by the
manufacturer and follow the application instructions to the letter.
• As mentioned earlier, do not reuse TTY head bolts. If the original
head gasket is multi-layer steel, the engine usually has TTY head
bolts. If new bolts are not included with the replacement head gasket,
don’t be tempted to reuse the old bolts.
• On engines that have conventional head bolts, inspect the head bolts
and discard any that are damaged or stretched. Then clean all of the
bolt threads and lightly oil them with engine oil before installation.
Dirt, thread damage and lack of lubrication can cause false torque
readings when the bolts are tightened.
• If the cylinder head has been resurfaced, check bolt lengths to make
sure they don’t bottom out in blind holes. A bolt that bottoms out will
apply little or no clamping force on the head, which may allow the
gasket to leak. To compensate for resurfacing, you may have to install
hardened steel washers under the bolts to raise them up, or use a
copper head gasket shim to restore proper head height.
• Look up the latest head bolt tightening specifications and procedures, as service procedures may have changed or been revised.
• Use an accurate torque wrench and angle gauge (if required), and
follow the recommended tightening sequence to make sure the head gasket
is loaded evenly when you install the cylinder head. Mistakes here can
lead to uneven loading that results in a poor seal and leaks.
• As a preventive measure, add a dose of cooling system sealer to the
coolant when you refill the cooling system. Also, make sure any bleed
valves are open while refilling the system so you don’t end up with air
pockets that may cause the engine to overheat. You may have to start
the engine and allow it to warm up to operating temperature, then shut
it off, allow it to cool and recheck the coolant level to make sure
there are no air pockets.
•Finally, make sure any factors that may have caused the original head
gasket to fail have been identified and corrected so the new head
gasket won’t suffer the same fate. Make sure the cooling system is
functioning normally and holds pressure. Make sure the engine doesn’t
knock or ping under load. And make sure the vehicle owner is using the
correct grade of gasoline (premium if required).