Head gasket failure has been something Subaru has struggled with to some extent since the 1980s. There are many thoughts as to why head gasket failure on Subaru has continued.
As a shop owner who specializes in the repair of Japanese vehicles, I thought I’d share some tips on Subarus.
Head gasket failure has been something Subaru has struggled with to some extent since the 1980s. There are many thoughts as to why head gasket failure on Subaru has continued.
My theory is that there is a horizontally opposed engine with an aluminum block and aluminum cylinder heads, two metals that tend to move around more than the traditional cast-iron block and aluminum heads found on most Japanese cars.
A poorly designed head gasket material also fuels the problem.
There are some other issues that relate to premature head gasket failure. Excessive corrosion has led Subaru to add more ground straps to the car on the later models.
The discovery of voltage in the cooling system is believed to contribute to gaskets getting corroded and failing. Although Subaru did have a service campaign that helped pay for the repairs for some Subaru owners, the program has pretty much gone by the wayside at this point.
The head gasket failures are found in a couple of different configurations, the most common of which is the external oil leaks at the back of the cylinder head, generally most prevalent on the left head or driver’s side.
The second type is the external coolant leak, the coolant leak most common on the driver’s side, as well. Generally, it starts with the oil leaks, then progresses to the coolant leaking too. I consider the oil leaks to be of concern, but when we see coolant leaking, the need for repair is more urgent.
We generally inspect the heads for the leaks, and then discuss with our customer the severity of the leaks. In many cases, you can monitor the leaks for a period of time before the repairs are classified necessary or urgent.
The final type of failure is the internal gasket failure that will produce the classic coolant loss and overheating. We see many shops try a variety of repairs, including thermostat, radiator and water pump replacement, only to leave the customer with money spent on repair bills that didn’t solve the problem.
[inpost_gallery post_id=4859 group=”1″]
DIGGING IN
The Subaru is a 2002 Outback with 109,982 miles. It has excessive oil leaks from the driver’s side head gasket and some from the passenger’s side. The vehicle had been repaired under warranty by the dealer at about 65,000 miles, and most likely the repairs were done without taking the engine out with probably only one head gasket being replaced.
To complete the head gasket replacement, follow these steps:
1. Disconnect and remove the battery (this will allow for a proper cleaning of the battery box), drain all fluids and remove four exhaust flange bolts. I generally take the whole front pipe off the car. This allows for better clearance and reduces the chance of damaging the oxygen sensor wires.
2. Remove the lower bell-housing bolts and motor mount bolts. Lower the car back down and remove the radiator, leaving the fans connected. Remove the air filter box and all intake boots.
3. Remove the upper bell-housing bolts, torque the convertor bolts (auto trans.) and disconnect the two-wire harness plugs on passenger’s side. On the driver’s side, remove the heater hoses, disconnect the two fuel hoses and remove the evap hose.
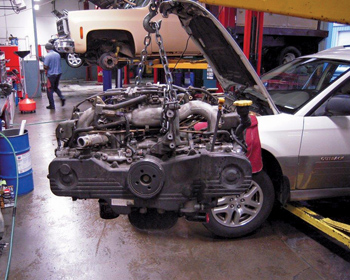
4. From the front of the engine, disconnect the A/C compressor from the mount and carefully hang it near the battery box. Remove the alternator completely from the car, remove the P/S pump from the mount, leave the hoses connected and hang them on the passenger’s side (See Photos 1 and 2). The engine can generally be out of the car in about 30-40 minutes. See Photo 3.
5. Remove the intake manifold, timing covers, timing belt and valve cover gaskets. Clean all the debris from the exterior of the block before removing the cylinder heads.
6. Remove the cylinder heads, and spend time to properly clean them and check them for warping or pitting. I can’t stress enough the importance of this phase — the surface needs to be thoroughly cleaned. Many shops or dealerships use a “wheel” to clean the surface.
This may be acceptable on some vehicles, but with the head gasket issue being so commonplace on Subarus, my opinion is that the leftover swirl marks can affect the integrity of the head gasket’s ability to seal once it’s re-assembled.
We’ve noticed on the vehicles on which we’re replacing gaskets that were previously done at another shop that they tend to have the swirl marks on both the block and the cylinder heads. I don’t suspect that the swirls will cause an immediate failure, but, over time, they can contribute to premature failure.
7. Use a razor blade to take the larger pieces of the old gasket off, then use a sanding block to remove the remaining debris to get a clean surface. We start with 220-grit, then we progress to 400 and 600 for the final cleanup. We use 0.002” as the criteria for re-machining.
I also consider if the heads have been off before and if there are the swirl marks from using the wheel, I generally re-machine the heads even though there may not be any significant warpage. This step will add some time since you’ll need to send it to the machine shop. Our local NAPA Auto Parts store’s machine shop provides a turnaround time of about an hour on a pair of Subaru heads for re-machining.
8. While the heads are at the machine shop, we focus on the block surface, using the block sander starting with 220-grit as stated earlier, and finishing with the 600-grit. Begin the task of working the surface to remove all dirt and leftover gasket material, taking your time to get the surface as clean as possible. This is also a good time to clean the engine cross-member area (see Photo 4), where much of the oil accumulates. Also, don’t forget the plastic gravel shield — another area for oil to accumulate.
9. Next, we focus on the front of the engine. Remove the oil pump and re-seal it, and replace the front crank seal.
10. Once the cylinder heads are back from the machine shop (see Photo 5), install them with the new head gaskets, and install new cam seals. Follow the head torque sequence. (Note: 2005 and later models may require new head bolts.)
11. Check the front idler pulleys for roughness (see Photo 6). There is one cogged pulley and two smooth pulleys. If the bearings feel rough, I would replace them. We see quite a few cars come in that had the head gaskets replaced develop a bearing noise in the front engine area. It’s a lot more affordable to replace them while the engine is apart.
12. Inspect the tensioner. You’ll generally see some wetness near the hydraulic area; replace it while it’s all apart.
13. Install the new water pump, thermostat and timing belt. The timing belt interval on this generation Subaru is 105,000 miles, so if it’s anywhere close to its cycle, change it. Then re-install the timing covers and closely inspect the rubber seals. If any oil has leaked from the oil pump area, chances are the seals will be swollen and won’t fit properly.
Note: We also check the PCV system to make sure all hoses are sealing and are clear. Also be sure to install new spark plugs (many will require new plug wires if they’ve been contaminated with oil).
14. It’s now time to re-install the engine. Once it’s installed, add fluids, and then unplug the coil wire and crank the engine until you have oil pressure. After you have oil pressure, connect the coil wire and start the car. With the battery being disconnected, the computer will need to go through re-learn. We’ve found that if you let the car idle, it will accomplish this much faster, generally in 5-10 minutes. Avoid touching the throttle to help the process