 If your installer customers complain about knocking or ticking from either cylinder head on a Honda 3.5L here are the steps to remove and install the cylinder heads.
1. Remove both valve covers.
Note: To ease the removal of the valve covers, remove the power steering pump with its hoses connected. This allows access to the wire harness mounting bolts.
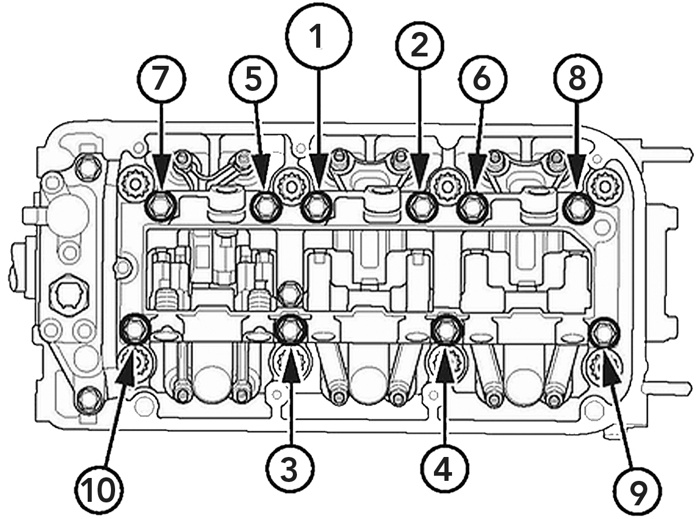
2. On the front cylinder head, loosen and then torque each rocker shaft bridge bolt one at a time in the sequence shown above.Torque the bolts to 21 lb.-ft. (28 Nm) to crush the bridge around the rocker shaft.
Note: The bridge is designed to crush around the rocker shaft so when torquing the bolts, it may initially feel like the bolt is stripped. This is normal. Continue torquing the bolts until the appropriate torque value is reached.
Note:
• Do not replace the bolt, the bridge or the head unless they are damaged.
• To avoid breakage, don’t overtorque the bolts.
• The bridge bolts for VCM and V-TEC engines have the same torque values and tightening sequences. Only the VCM cylinder head is shown in the image.
3. On the front cylinder head, loosen and then re-torque each rocker shaft bridge bolt again one at a time in the sequence shown in Fig. 1. Torque the bolts to 18 lb.-ft. (24.5 Nm).
4. On the rear cylinder head, loosen and then torque each rocker shaft bridge bolt one at a time in the sequence shown in Fig. 1. Torque the bolts to 21 lb.-ft. (28 Nm) to crush the bridge around the rocker shaft.
5. On the rear cylinder head, loosen and then torque each rocker shaft bridge bolt again one at a time in the sequence shown in Fig. 1. Torque the bolts to 18 lb.-ft. (24.5 Nm).
6. Check the valve clearances and adjust if needed. Clearance specs: (Cold) Intake: 0.20-0.24 mm (0.008-0.009 in.), Exhaust: 0.28-0.32 mm (0.011-0.013 in.).