Much of the information used to write this
article was provided by Bruce Chapman, president, and the employees
of Ontario Reman, Etobicoke, Ontario, Canada. Ontario Reman is
an authorized Chrysler engine rebuilder selling remanufactured
engines and small parts to Canadian Chrysler dealers. We thank
them!
Chrysler introduced a whole new family of 60
degree V6 engines beginning with the 3.3L OHV in 1990. It was
followed by the 3.8L OHV in 1991 and the 3.5L SOHC that came out
in 1993. All three of these engines have performed well and provided
good service, but the industry continues to change so quickly
they will soon be replaced in the cars by another family of SOHC
and DOHC engines that will be introduced in 1998!
The good news for rebuilders is that there
are a lot of these engines installed in cars and vans that are
worth fixing and they’re getting up there in miles, so there’s
a growing market for the rebuilder who knows what to expect.
The 3.3L was originally designed to replace
the 3.0L SOHC V6 Mitsubishi engine that Chrysler had been using
since 1987 in its upscale cars and minivans. The 3.0L was a good
engine, but it was a little low on torque in a heavy vehicle,
so Chrysler designed a torquer to replace it, and it did an incredible
job of it in the process. In fact, the 3.3L is so good that it
delivers 90% of its peak torque from 1200 rpm all the way on up
to 4400 rpm!
Chrysler did it with a very modern, conventional
pushrod motor that has a 2.66" (93mm) bore and a 3.19"
(81mm) stroke for a displacement of 201.5 cu. in. The aluminum
heads have a heart-shaped chamber with two squish areas to provide
optimum combustion, along with gorgeous exhaust ports that really
help the flow of the exhaust gasses.
The over-square design allowed the engineers
to install bigger valves to get more horsepower, so they used
1.80" (45.5mm) intake valves and 1.48" (37.5mm) exhausts.
A nodular iron cam is used along with low friction, roller hydraulics.
Semi-conical, variable rate springs are used
with light-weight retainers. The push rods are carefully spaced
to avoid interfering with the free flowing, symmetrical intake
ports. The engine has four mains nestled in a deep-skirted block
that provides a rigid lower end and less noise. A flat pan rail
ensures good gasket sealing. The nodular iron crank has rolled
fillets and cross-drilled mains.
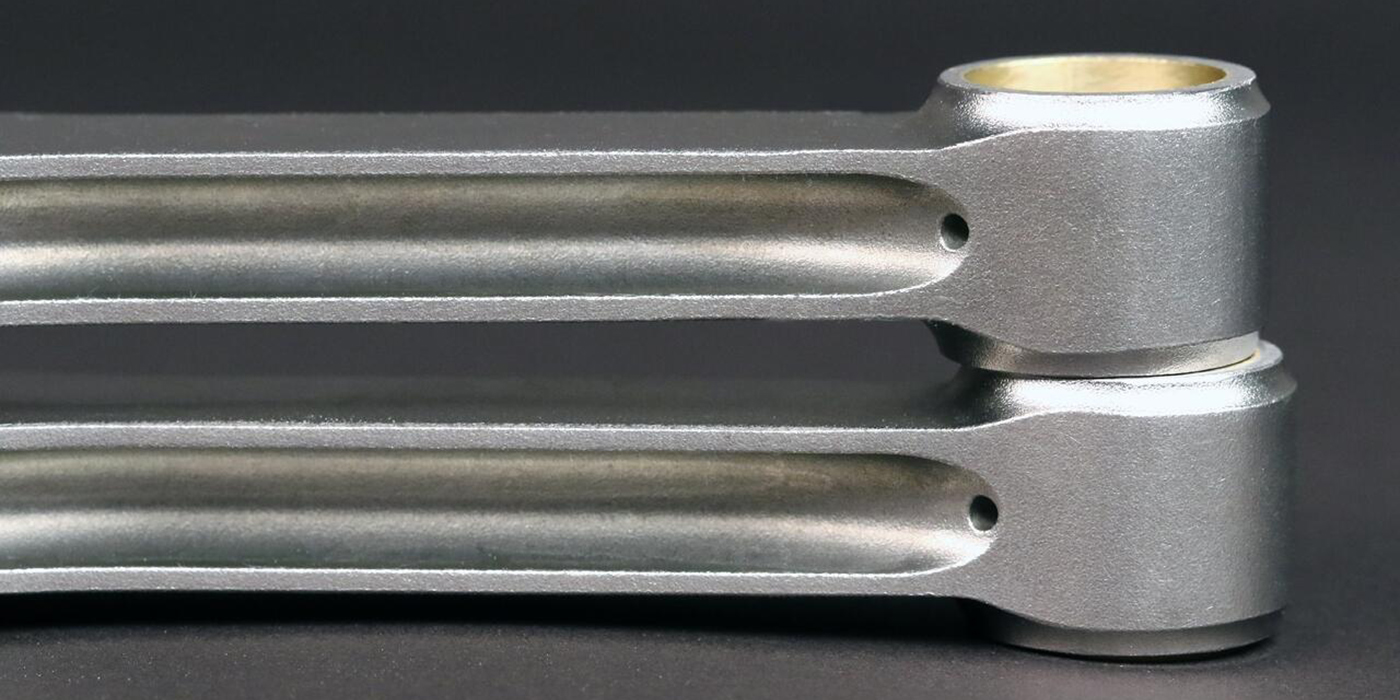
The connecting rods are forged steel that measure
6.18" (157mm) from center-to-center. There are small weight
pads on both ends that are used for balancing. The ignition system
and fuel injection are controlled by an ECM that gets information
from both the crank and cam position sensors. The crank sensor
is mounted on the bell housing where it gets a signal from the
notches in the flex plate. The cam position sensor is mounted
in the front cover so it can read the nine notches in the cam
sprocket.
A knock sensor is used to detect detonation
in the ’96 and up minivans. It’s interesting to note that the
original engine managed to meet all the applicable emissions standards
without an air pump, aspirator or EGR system, except in California
where it needed an EGR valve to meet their tougher requirements.
All-in-all, the 3.3L was a very good pushrod
motor and its 3.8L "big brother" was identical except
for a bigger bore (3.78") and a longer stroke (3.43").
The 3.8L was rated at 162 hp, just like the later 3.3L engines,
but it developed more torque at a lower rpm (213 at 3300 rpm vs.
194 at 3600 rpm), so it performed better in the bigger cars and
vans.
The 3.5L is a different story
The 3.5L engine is a whole different story.
Although it’s part of the same 60-degree family and shares some
common specifications, it’s really a totally different engine
because it has overhead cams instead of pushrods. It’s still an
over-square design (3.78" x 3.19") so it breathes deeply
and revs freely with its aluminum, four-valve, single overhead
cam heads.
A forged steel crank and steel rods ensure durability. A distributorless
ignition system is used along with electronic, sequential port
injection. A split plenum with a special computer controlled "Manifold
Tuning Valve" is used to regulate plenum volume according
to the load. The end result is 214 hp at 5800 rpm with 90% of
peak torque all the way from 2000 rpm on up to 5600 rpm. This
is one stout motor with great low end torque that still makes
almost one horsepower per cubic inch when it’s working hard.
Component parts
Now that you have an overview of this entire
engine family, let’s take a look at the pieces and parts that
are used in each one to see what it’s made of and how it has evolved
over the years. We’ll begin with the 3.3L and 3.8L since they
are virtually identical, except for the components that were changed
to accommodate the differences in bore and stroke.
BLOCKS
3.3L: The original block that came out in ’90
(c/n 4448030) was used in transverse applications up through ’92.
In ’93, when the 3.3L became the base engine in most of the new
LH sedans, it was also installed longitudinally (front-to-back
instead of transverse), so four additional threaded bosses were
added to the block. Two were located just above the pan rail on
the passenger side, and two were angled down just above the pan
rail on the driver’s side. This block had a 4556430 casting number.
Unfortunately, there are two versions of this
casting, one for the LH cars that has the two extra bosses on
the passenger side sticking out prominently from the side of the
block, and one for the transverse applications that has them machined
off almost flush, so you have to see the block to know what it
fits.
You can use the LH block in a minivan by machining
down the two bosses on the right side, but that’s probably not
a good idea since they’re in such short supply. You can’t use
the minivan block with the shorter bosses in an LH car because
the mounts won’t fit.
There’s another casting that came out in either
’94 or ’95 (c/n 4621763) that’s identical to the revised ’93 block,
and one more new one that came out in ’96 (c/n 4621944) that’s
used up through ’97. It has an additional threaded boss midway
back on the driver’s side (that’s on the front when the engine
is installed transversely), and about two inches up from the pan
rail. It’s used for the knock sensor that’s required for the minivans.
The LH cars didn’t have a knock sensor, so you can continue to
use the 4556430 or 4621763 block without this extra boss in the
’96-’97 cars if you are short of the late ones.
3.8L: The 3.8L shares the same block with the
3.3L year-by-year. The only difference is the larger bore. The
3.8L never was used in the LH cars, though, so the two extra bosses
on the right side (that’s on the back side when the engine is
installed transversely) of the ’93 and later 3.8L castings are
always machined down almost flush with the block, too.
There have been reports of significant core
shift on all of these blocks, so it can be risky to bore the 3.8L
blocks very far oversize. It’s better to bore a 3.3L block up
to a 3.8L standard than to bore a 3.8L block oversize unless you
check all the cylinders with an ultrasonic tester to make sure
there aren’t any thin spots that will cause problems.
More on blocks: There are some main caps that
have a wide groove for the bearing tang and others that have a
narrow groove. If you use the bearings with the wide tang, you
may have to file the cap to make sure they will fit from time-to-time.
If you use the ones with the narrow tang, you will have to crowd
the tang to the front in order to position the bearing correctly
in the wide slot.
CRANKS
3.3L: The 3.3L has used only one crank since
1990, except for a few of the very early engines that had an unusual
crank with smaller rod journals. The 3654 casting is found in
99.9% of the engines, but there are some rare ones that had the
8044 casting with the small rod journals (we’ve seen one). If
you happen to end up with one of these cranks, just throw it away
and replace it with a 3654 casting and a matching set of rods.
3.8L: The 3.8L crank is a 6433 casting. It
has a 3.42" stroke instead of the 3.19" stroke that’s
used on the 3.3L. It can easily be identified by the larger counterweights;
the second one is noticeably bigger, along with some of the others.
RODS
3.3L: There have been several different rod
castings used for the 3.3L including a 4448903, a 4654355 and
a 4621694. They are all the same except for some minor differences
in the size of the balance pads located on the caps. This creates
a small difference in the weight of the rod, so it’s best to keep
them in sets by both casting number and weight. There are a few
of the very early rods that were used with the odd-ball 8044 crank
out there, too. They measure 2.0830" on the big end instead
of 2.400" like all the rest of the rods. Throw them away
if you end up with a set.
3.8L: The 3.8L rod is shorter than the 3.3L
rod in order to compensate for the longer stroke with the same
deck height. Look for a 4448904 or 4654356 casting. There have
been reports of a few 3.8L rods literally breaking in half, so
they should all be carefully inspected and probably even Magnafluxed™.
And, if there’s one broken rod in a motor, it would be wise to
double check the rest of the set or throw them all away to play
it safe.
More on rods: The rod bolts used on both the
3.3L and 3.8L employ a torque-to-yield design that requires the
use of a torque-turn technique during assembly. They can only
be reused three times, so, theoretically, they could be at the
end of their useful life by the time the rebuilder disassembles
the engine, tightens the bolt to recondition the rod, loosens
it to take it apart again, and then retightens it to assemble
the engine. Some rebuilders are reusing the old ones quite successfully
while others are using all new bolts. It’s your call.
PISTONS
3.3L: The 3.3L piston is a full-round design
with a large, oblong dish in the middle of the crown. The pin
is a press fit in the rod. The same piston has been used in this
engine since 1990.
3.8L: The 3.8L piston looks similar to the
3.3L, but it has a deeper, oblong dish in the crown. Only one
piston has been used since 1991.
CAMS AND TIMING
3.3L: There have been three cams used in the
3.3L during its lifetime. According to Chrysler, all the engines
built from ’90 through ’93, prior to date code 626 and production
number 4573132, should use the p/n 4448049 cam along with the
early, "shrouded" head. All the engines built in ’93
after date code 627 and production number 4663497 should use a
p/n 4761387 cam along with the new, "unshrouded" cylinder
head.
The cam was changed once more in ’94 (p/n 4621685)
and used with the "unshrouded" head to add more low
end torque and improve acceleration by 2% to 3%. This cam also
"aids intake air flow for smoother high speed operation"
and "reduces noise by 5 DBA at 5000 rpm."
Actually, all of these cams are very similar
when you compare the specs; they are impossible to tell apart
without a cam machine because they all have "645" stamped
on the barrel behind the front bearing. Most rebuilders are using
them interchangeably in spite of the subtle differences that are
claimed. Let your conscience be your guide.
3.8L: Two of the cams used in the 3.3L have
been used in the 3.8L engines. The 4448049 was used from ’91 through
’93. In ’94 it was replaced by the 4621685 cam that is still being
used today. Most rebuilders are interchanging all of the V6 cams
in these engines without any problems.
More about cams and timing: There have been
a few reports of broken cams, especially in some of the earlier
3.3L engines. It appears that either the cam had too much initial
clearance, or the middle bearings were too soft, so they wore
quickly and allowed the cam to flex until it broke. It’s not a
common problem, but it may show up occasionally.
The original timing chain was a soft-backed
design that had to have a snubber bolted to the block to guide
it. The later engines use a stiff-backed chain that doesn’t require
the snubber, so some of the later blocks aren’t drilled for it;
Chrysler says to throw it away when you install the newer chain.
Both versions are available, so be sure to specify the one you
prefer and use it with or without the snubber, as appropriate.
Both of the upper oil galley plugs in the front
of the block, just behind the timing chain, have small bleed holes
in them either to oil the timing chain or to allow any air that
gets trapped in the oil galleys to escape. In either case, the
replacement plugs should have the holes. You may have to drill
them in the standard plugs because the drilled ones aren’t available
in the aftermarket.
The cam gear and thrust plate were changed
in ’94. The original plate was oval in shape and measured .217"
thick. It goes with the thick gear that has the number 89707405
molded in the front of it. The later plate looks the same, but
it’s .080" thicker (.297" total), and it’s used with
a thinner cam gear that has the number 62207405 on it. The matching
plate and gear must be used together or you will get to do it
over again. A replacement kit with the thick plate and thin gear
is available from Chrysler (p/n 4778707) as well as other aftermarket
suppliers.
Both of these engines use roller hydraulic
lifters. They originally came with the same unmetered lifter used
in the early 318/360 roller motors. The pushrod socket in the
rocker is blind and gets lubricated by oil coming up through the
pushrod from the lifter. The oil dead-ends in the rocker socket
so it doesn’t have to be metered, but you can use the metered
lifters from the Magnum motors if you prefer because they will
provide more than enough oil for the pushrod socket. The lifters
are held in place with a six-fingered, steel retainer that is
a dealer only item, but it’s cheap, so call the dealer if you
need one.
CYLINDER HEADS
3.3L and 3.8L: Both engines have used two different
heads from 1990 through ’97. The original head was a 4448015 casting
with a heart-shaped chamber that was shrouded around the backside
of the intake valve (opposite the spark plug). It was replaced
in mid-to-late ’93 by the 4621510 casting that had less shrouding
around the intake valve.
According to the Chrysler parts book, the early,
"shrouded" head should only be used with the early cam
(p/n 4448049). The later, "unshrouded" head should only
be used with one of the later cams (p/n 4761387 or p/n 4621685).
However, since Chrysler is supplying only the late, "unshrouded"
head in the box, no matter which one you order, it appears that
either head can be used with either cam, although it’s probably
best to use them in pairs.
All of these heads have proven to be quite
durable, but they should be checked for two possible problems:
1) They occasionally crack by one of the inner
head bolt holes on the lower edge; and
2) The rocker stand on the end sometimes breaks
off almost flush with the top of the head surface.
We suspect that the bolt holding the rocker
shaft down wasn’t torqued properly at the factory so it allowed
the rocker shaft to flex until fatigue finally broke the rocker
stand. You can fix it by welding it back on and drilling the hole
in the head deeper so you can install a stud that sticks up far
enough to allow you to torque the rocker shaft down without overstressing
the weld.
Some of these heads have a hole drilled for
a temperature sensor in one end of the head and others don’t.
We don’t know which applications require a sensor, so it’s best
to drill and tap all of them so they will work for any application.
Both the 3.3L and 3.8L use torque-to-yield
head bolts. They are the same ones that are used for the 2.2L
and 2.5L, so they are readily available. Chrysler says they can
be reused up to three times. You can inspect them for stretch
by comparing the threads on a used bolt to those on a new bolt.
Or, better yet, you can play it safe and replace all the head
bolts just to be sure the clamping force is uniform and correct.
FRONT COVERS
3.3L: There are two front covers used on the
3.3L. Both of them house the oil pump and the water pump. The
cover used on the transverse engines has one ear about even with
the top of the water pump on the driver’s side (front) that’s
reinforced and drilled for a bracket of some kind.
When the 3.3L was installed in the LH cars,
a second ear with another bolt hole was added directly below the
original one and about even with the bottom of the water pump
(see photo on page 27).
3.8L: The 3.8L was only installed in transverse
applications, so it always uses the front cover with only one
ear on it.
Summary
That’s the story on the 3.3L and 3.8L engines.
They are both pretty conventional OHV engines that are easy to
rebuild. In fact, the only hard part is installing the cam bearings
correctly because of the obstructed tunnel that is inherent in
the design of the 60 degree block. Other than that, rebuilding
one of these engines is about like doing any other small V6 with
aluminum heads; there are no real surprises.
The 3.5L SOHC
The 3.5L SOHC motor, however, is a whole different
story from start to finish. First, let’s take a look at all the
different pieces and then we’ll look at how they go together.
It’s a complicated little engine.
BLOCKS
The 3.5L block shares its basic geometry with
the 3.3L/3.8L engines. The bore spacing is still 4.45", the
deck height is still 229mm, and the mains are the same size; but
that’s where the similarity ends. It has four mains with the two
middle ones cross-bolted for greater strength. The front of the
block has been modified to accommodate a new oil pump and a different
water pump along with a sprocket for the timing belt and the covers
needed to shield it.
The drilled bosses on both sides of the block
for the motor mounts and accessories are different, too. The deck
surfaces were altered to provide oil feed and drain holes along
with the crankcase vent holes. The water transfer holes were relocated.
Two bosses were added in the valley for twin knock sensors.
There is only one version of the 3.5L block
with two different casting numbers from ’94 through ’97. The casting
numbers are 4556530 and 4663458.
CRANKSHAFT AND BEARINGS
The Crankshaft: The 3.5L uses a forged steel
crank with "the most highly developed finish ever used at
Chrysler." It has no identification number on it. The standard
main journals are 64mm in diameter and the rods are 58mm. The
counterweights are bigger than those on the 3.3L crank because
of the increased reciprocating weight.
Chrysler specifies a 1177 gram bobweight on
the #1 and #6 crank throws when balancing the engine. The nose
of the crank was modified to accommodate the wide sprocket needed
to drive the timing belt. The sprocket is interference fit on
the straight snout and located with a pin that’s driven into the
crank instead of being aligned with a keyway.
More About Bearings: Chrysler uses a unique
six-piece thrust bearing in this engine. The two thrust flanges
are loosely held on each bearing with four small tabs so they
can move around and align themselves to the crankshaft. They also
incorporate the latest "ramp and flat" design that increases
their load carrying capacity by a factor of three compared to
that of a conventional, flat-faced, thrust bearing.
Rebuilders should be sure to use an equivalent
bearing, because Chrysler’s FWD transmissions tend to load the
thrust bearing pretty heavily. Be sure to notice that the upper
main is grooved and the lower one isn’t; there’s a right way and
a wrong way to install them.
RODS
The rods in the 3.5L are forged steel with
a full floating pin. The bushing is available from AE Clevite
under p/n B10011. These rods are unique because they don’t have
any balance pads. Instead, Chrysler matches the rods with the
pistons to equalize the weights. That’s something that needs to
be considered when rebuilding this engine.
These rods can’t be bought separately from
Chrysler. They are available only as an assembly that comes with
a standard piston, so they are real expensive. There are two forging
numbers on the rods; look for either 4573149 or 4663422.
PISTONS
The 3.5L pistons have a full-round, short-skirted
design with four valve reliefs so they can "free-wheel"
if the timing belt breaks. There’s a right and a left piston for
both the early (’93-’94) and late (’95-’97) designs. The later
piston has a wide chamfer on the edge of the crown along with
a black anti-scuff coating on the major and minor thrust faces.
It appears to be interchangeable with the earlier design from
a rebuilder’s perspective.
The wrist pin is a full-floating design that
is retained by two circlips in the piston. They are very difficult
to install without a special tool because they don’t have a loop
of any kind on either end. So, the guys at Ontario Reman made
their own special tool to install the circlips You will have to
make something similar in order to install them correctly so they
will stay in place when the engine gets some miles on it.
HEADS
The cylinder head is an aluminum DOHC design
with four valves per cylinder. The same head fits both sides,
but there are two different versions. The original head (’93-’94)
was a 4315807 casting. It had four indentations protruding into
the chamber. The later head came out in ’95 and was used through
’97. It’s a 4663490 casting that has more of an oval chamber with
only one indentation sticking into the chamber.
Although it’s too early to say for sure, these
heads don’t seem to be prone to crack. However, we have seen some
with damage to the cam bore due to a lack of lubrication. The
head itself is really pretty simple, but the rocker setup gets
a little bit busy with 12 roller rockers, each with its own miniature
lash compensator, bolted to the head on top of one cam. One look
at the pictures that are included with this article will tell
the story better than a thousand words, so see for yourself.
The bad news is that the lifters are not available
by themselves because they can’t be serviced separately. They
are held tightly in the rockers with a wire clip that makes them
almost impossible to remove without damaging either the lifter,
the rocker, or both.
The lifters are available only as part of a
rocker assembly that lists for close to $40. That means a set
of lifters will probably cost a rebuilder more than $500 net until
somebody figures out a way to remove and replace them without
ruining the aluminum rockers, and the lifters themselves become
available in the aftermarket.
There are four different rockers used. There
are right and left versions of both the intakes and exhausts,
so the rockers must be assembled accordingly. Each rocker assembly
is bolted to the head with 10 bolts, but there’s a catch in ’93;
the oil is metered to the rockers by the narrowed shank on the
third bolt from the front on the top row.
There’s only one bolt with the narrowed shank used in 1993; it’s
silver-plated instead of black like the rest of the bolts, so
it can be easily identified and installed in the right place to
provide oil to the rockers. Chrysler eliminated any possible confusion
with these bolts in ’94 by installing the narrowed version in
all 10 bolt holes.
The 3.5L uses two different head gaskets, too.
They are clearly marked right and left, so that shouldn’t be a
problem.
The spark plugs are located inside six long
tubes that screw into the heads. They should be removed when rebuilding
the heads, but they can be hard to get out. The service manual
suggests the use of a vice grip to get them out and a couple of
rocker cover nuts to put them back in, but that really doesn’t
work. So, Ontario Reman adapted a small, expandable mandrel with
a heavy knurl on the outside to remove and install them without
damaging them in the process. It does work.
CAMS
The 3.5L has right and left cams that are distinctly
different. They can be identified by comparing the snouts on both
of them. The cam for the left head is considerably longer and
it has a wider front journal, too.
There are right and left timing sprockets, too, and they are both
held on with a couple of long bolts that are also different on
each side. The left sprocket is wider and has windows in it for
the cam position sensor, and the left cam bolt is noticeably longer,
too.
THE FRONT END
Chrysler uses three separate covers to house
the oil pump and the water pump and enclose the back and sides
of the timing belt. Take good care of them, because they are expensive
if you have to replace them.
The timing belt also drives the water pump. It’s tensioned by
a hydraulic tensioner on an idler pulley that’s located on the
lower right corner, just above the oil pump. In ’95, Chrysler
put a larger pulley on the water pump, changed the tensioner and
switched to a longer belt. You can identify the later setup by
the size of the pulley.
TIMING THE ENGINE
Timing the 3.5L is a little more involved because
the cam sprockets are not keyed to the cams. They have a large
"D" shaped hole that provides an approximate location
for initial timing, but it requires several additional steps to
get the cams timed right. First, the #1 piston must be up on TDC;
it’s the right front cylinder on this engine.
The service manual explains how to find TDC
after the heads are installed, but Ontario Reman says it’s easier
to use a dial indicator on the #1 piston before installing the
heads. After the heads are installed along with the three front
covers, the cams are positioned and locked in place by using two
of the Miller 6642 tools that are bolted on to the back of each
head where the cam cover is normally bolted on.
Install the sprockets without tightening them
while making sure that the dot on each one is located between
the two dots on the adjacent housing. Slip the belt on correctly,
hold it in place with some big paper clips and then tighten the
sprockets down to 90 ft. lbs. (Yes, it takes a big metric wrench
to hold the sprockets when you tighten the bolts).
You can verify the accuracy of the procedure
on some engines by slipping a screwdriver through the hole in
the upper housing; it will drop down into a hole in the cam if
everything has been done right and the cam was drilled correctly
in the first place. Remove the Miller tools from the back of the
cams, release the tensioner and you’re ready to button it up once
it’s been properly timed.
A word of caution: Be sure to use sealer on
every bolt on the front of the engine. Some of them go into open
holes that have oil or water behind them so they will seep and
leak and cost you a lot of money when they need to be redone out
in the field.
Thoughts on the 3.5L
The 3.5L short block is simple to build and
the heads themselves aren’t too bad either. You can even get at
the valves without any problems. The real kicker is the rocker
setup with the lifters that aren’t available separately. Timing
the cams is a little time consuming, too, but practice makes perfect.
All-in-all, it’s a pretty rebuildable engine and not nearly as
bad as some other SOHC V6s.
Conclusion
So, that’s the story about "the little
engines that could." All three of Chrysler’s 60-degree V6s
have proven to be well-designed, durable workhorses in cars and
vans. Although they are soon to be replaced by another whole new
family of engines in the cars, the 3.3L and 3.8L will continue
to be used in the minivans, so we will all be rebuilding them
for many years to come.
Doug Anderson is vice president of Grooms Engines, Parts, Machining,
Inc., a production engine rebuilder located in Nashville, TN.
He is a regular contributor of technical articles to Automotive
Rebuilder magazine.