Over the years, I have had occasion to port cylinder heads when I had no prior experience with that particular casting. The results have not always been as good as I would have liked them to be, but with only one head or one pair of heads available to work with, the development opportunities were limited.
I have thought many times that it would be nice to have a junk head to work with before starting on the real part. Flow boxes are widely used in Detroit, but the task of duplicating a particular port and combustion chamber accurately enough to make it useful would be prohibitively time consuming. What is needed is a quick, inexpensive way to duplicate any existing port accurately enough to be useful in flow bench testing, can be machined and altered like metal, and not cost more than can be charged for the whole job.
In his book, Practical Gas Flow, available from Classic Motorbooks, John Dalton describes making a flow box out of plaster. He pours his mold in two pieces so he can separate the two halves and check the shape of the port as he goes. "At last," I sighed in relief, "the answer to my problem."
I visited the local Hobby Lobby and bought some Plaster of Paris. Then I went to Home Depot and bought a sheet of 1/8˝ plexiglass, and started making a flow box. Since I was already making rubber molds of ports, the rest was duck soup. Or so it seemed.
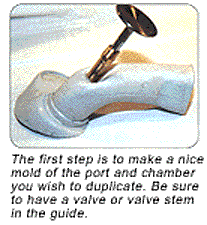
I made a one-piece rubber mold of an intake port and combustion chamber of my project head, a big block Chevy from Canfield. When making the mold, I stuck a valve upside down in the guide, with the tip about even with the valve seat. Later, when the flow box is cast, this will be used to support a spare valve guide that will be cast into the flow box.
I cut up the 1/8˝ plexiglass to make a rectangular box, duct taped the pieces together, and attached the mold of the port and chamber in place with sheet metal screws. The key elements here are to make the base of the box big enough to cover the hole in the head adapter on the flow bench, and since the rubber mold is somewhat flexible, to accurately locate the mold in the box.
The Plaster of Paris was mixed per instructions, poured in the mold and allowed to set up. After the plaster set up, the sides of the box were removed and the rubber mold was pushed out, leaving the plaster flow box with a valve guide firmly in place. Cool!
First problem. The plaster was still damp, and required baking in the oven to dry it out. After the plaster was completely dry, the second problem surfaced. This thing is like a piece of compacted talcum powder. Every time I touched it, I had plaster powder all over me, the bench, in the air, everywhere, and it