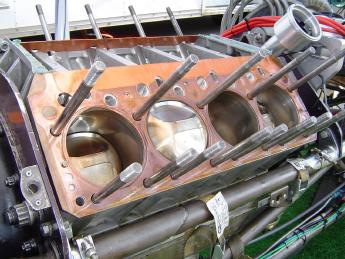
How important are the various fasteners in an engine? Consider this: the head bolts have to withstand tremendous loads to keep the cylinder head sealed tightly against the head gasket and block. In an engine with four inch cylinder bores and peak combustion pressures of around 1,100 pounds per square inch, each cylinder exerts about 13,827 lbs. of pressure against the cylinder head at full throttle. In fact, head bolts may have to handle loads of more than five tons per bolt at wide-open throttle!
The clamp load that is typically required to keep the head gasket sealed under these operating conditions is about three times the peak pressure exerted against the head (this is called the “lift-off” force). As a result, the bolts around the combustion chamber have to exert a combined force of about 41,500 lbs. to hold the head in place. If each cylinder has four head bolts around it, each bolt has to exert a clamping load of 10,375 lbs. If there are five head bolts per cylinder, the load needs to be 8,300 lbs. per bolt. If there are six bolts per hole, then the load required drops to 6,916 lbs. per bolt.
In a performance engine or diesel, the loads are even higher. With peak combustion pressures of up to 1,400 psi or higher in a performance engine, or 2,400 psi in a diesel, the load on the head bolts is far greater. Consequently, the clamping force on the head bolts is even more critical than those in a stock engine.
Head bolts are truly one of the most critical fasteners in any engine. Consequently, it’s extremely important that all the head bolts be in perfect condition and are installed and lubricated properly so they are not overloaded.
Bolt Stretch and Loading
Though head bolts seem to be pretty rigid fasteners, they are actually designed to stretch. Stretching a bolt is like stretching a rubber band. It allows the fastener to exert force against a surface to hold the parts together. This is especially important with gasketed surfaces because the gaskets have a certain amount of give that must be overcome by the fasteners to maintain a tight seal.
When you tighten a head bolt, the force exerted by the wrench is accomplishing two things. First, it is overcoming the friction between the threads on the fastener and the hole threads in the block and the friction of the underside of the bolt head as it turns against the cylinder head. This accounts for about 90 percent of the force exerted on the wrench! Second, tightening the fastener stretches it to create clamping force. This accounts for the remaining 10 percent of the force exerted on the wrench.
One of the most common misconceptions about using a torque wrench to tighten head bolts is that the torque reading on the wrench indicates how much load is on each bolt. The reading on the wrench only tells you how much twisting force is being applied on each bolt. The actual clamping load will be much, much higher, and will depend on the friction in the threads, the size, pitch and diameter of the treads, and the length of the bolt.
Remember, we said each head bolt has to exert a force of four to five tons (8,000 to 10,000 lbs.) to keep the head gasket sealed. A torque wrench reading of 80 ft.lbs., therefore, doesn’t mean the bolt has 80 lbs. of load on it. The thread pitch acts like a screw jack to multiply the load factor. As a result, each bolt may exert a clamping load of up to 100 times or more the reading on your torque wrench! That also explains how torquing a head bolt can exert enough pressure to actually stretch it as much as .006? to .010? or more depending on the length of the fastener.
As the head gets hot, thermal expansion is going to stretch the head bolts even more – especially in engines with aluminum heads. Aluminum expands at more than twice the rate of cast iron, which puts even more strain on the head bolts. In a typical engine, just warming the engine up to normal operating temperature may stretch the head bolts as much as .005? or more.
A head bolt exerts its maximum clamping force when it is stretched to its “yield point.” This is the point where the bolt can stretch no further without being permanently deformed.
Like a rubber band, a head bolt under load will stretch and spring back to its original length when the load is released. But if stretched too far, the bolt will either become permanently elongated or break. Head bolts that have become permanently elongated may deform along the length of the shank or in the threaded area. Inspecting head bolts, therefore, for obvious “necking down” in the shank or at the top of the threaded area can reveal bolts that have been stretched too far and should be replaced. Reusing a deformed bolt is risky because the bolt may not hold proper torque, and it may fail when you attempt to retighten it. Or worse yet, it may fail at some point later down the road causing the head gasket to leak and/or the engine to overheat.
When engineers design a new engine, one of the many tasks they have to do is figure out what size head bolts to use and how much torque the bolts will require to achieve the proper clamping force. Some of this comes from previous experience, and some comes by trial and error testing. The compressibility and spring-back of the head gasket, the configuration of the cylinder head, the number of head bolts around each cylinder, the comparative lengths of the head bolts (all the same length or different lengths), etc. are all taken into account when figuring how much torque is required to achieve a certain clamping load.
Torque-To-Yield
Torque-To-Yield (TTY) is a term that you should be familiar with because it describes a type of head bolt that is used on many late model engines. Unlike ordinary head bolts, TTY head bolts are designed to deform – but do it in a controlled way. Like a standard head bolt, a TTY bolt will stretch and spring back up to its yield point. But once the yield point is passed, the bolt becomes permanently stretched and does not return to its original length. Because of this, TTY bolts should not be reused.
Why intentionally stretch the head bolts? Engineers discovered they can get much more even clamping on the head gasket if all the bolts are evenly loaded. Since variations in friction between bolts always causes some uneven loading, stretching the bolts guarantees all the bolts will exert the same clamping force regardless of the torque reading on the wrench. The result is improved cylinder sealing, longer head gasket durability and less cylinder bore distortion (for reduced blowby and more power).
TTY head bolts are typically used on engines with aluminum cylinder heads (where there is a lot of thermal expansion) and with multi-layer steel (MLS) head gaskets. MLS head gaskets are very stiff gaskets with much less compressibility than standard soft-faced composition head gaskets. On the other hand, MLS head gaskets are almost bullet-proof and produce much less bore distortion than other types of head gaskets because they require less clamping force. But to seal properly, MLS head gaskets require very smooth (almost polished), flat surfaces on the head and block. This, in turn, requires very precise and even clamping loads by the head bolts. That’s why TTY head bolts are used in these engines.
How can you tell TTY head bolts from ordinary head bolts? TTY head bolts are typically longer and narrower than standard head bolts. Factory service manuals will tell you which applications use TTY bolts, and you can often tell from the head bolt tightening procedure if the bolts are TTY or standard. TTY bolts typically have an angle tightening specification rather than a specific torque value (which requires using an angle gauge when tightening the bolts).
The torque procedure for tightening a TTY head bolt involves tightening it until a certain torque reading is reached. Then the bolt is given an additional turn to a specified angle (say an additional 45 to 90 degrees) to load the bolt beyond its yield point for maximum clamping pressure.
Torque Tricks
As we said earlier, the amount of torque that’s needed to achieve a given clamping load when tightening a head bolt will vary according to the amount of friction between the fastener’s threads and bolt head against the cylinder head. So anything that reduces thread friction also reduces the amount of torque that’s required on the fastener. Or put another way, anything that reduces friction also multiplies the clamping load exerted by the head bolt at a given torque reading.
As a rule, the threads and underside of the head on most standard automotive head bolts should be lubricated with motor oil before the bolts are installed. The torque values specified by the engine manufacturer are typically based on oiled threads and fasteners – not dry fasteners. Most service manuals recommend using straight 30W oil or 10W-30 multi-viscosity oil. Though 10W-30 is obviously a thinner oil than straight 30W oil, one gasket engineer we interviewed said the difference is negligible and has almost no measurable effect on bolt loading.
With other thread lubricants, however, results may differ. Molybdenum-based assembly lubes, graphite, Teflon-based products and even beeswax can all be used to lubricate bolt threads and heads. But these lubricants typically reduce friction much more than ordinary motor oil, so using any of these products requires reducing the applied torque accordingly. Some experts recommend using 20 percent less torque when tightening a head bolt that has been lubed with molybdenum, graphite, Teflon or wax. Follow the lubricant or bolt manufacturer’s recommendations (aftermarket head bolts and studs are usually supplied with a special lubricant).
The same precautions apply for head bolts that thread into water jackets. The threads must be coated with sealer to prevent coolant from leaking, and the sealer will act as a lubricant to reduce friction. When using a sealer, follow the recommendations of the OEM or sealer supplier as far as how much torque to apply on the bolt(s).
Installing head bolts dry can lead to trouble because the increased friction in the threads can reduce clamping force up to 25 percent or more at the same indicated torque reading.
Dirty, deformed or damaged threads can also cause problems when it comes to tightening head bolts. You may think you’ve applied the proper amount of torque, but the bolt may be exerting much less clamping force than normal depending on how much friction is in the threads. Dirty threads can reduce the clamping force up to 50 percent or more!
How many times a head bolt has been run down also has an effect on torque and clamping force. New threads are rougher than used threads and generate more friction (which reduces clamping force). When a head bolt is run down, new threads are burnished slightly. This reduces friction and increases the clamping force the next time the same bolt is reused. After four or five cycles, there may be a significant reduction in friction and a significant increase in clamping force. The result may be stretched bolts or broken bolts if a standard head bolt is reused more than several times.
One thing you never know as an engine builder is whether or not an engine has been rebuilt before, or how many times the cylinder head has been on and off the engine during its lifetime. With a low mileage engine, it’s probably safe to assume the heads have never been off the engine, or if they have it’s only been once. Therefore, it’s probably safe to reuse the original head bolts assuming they are not TTY head bolts (which should not be reused).
On a high mileage engine, or a performance engine, it’s risky to reuse the original head bolts because the engine may have been torn down several times already. It’s much safer to toss the old head bolts and install new ones.
When new head bolts are used, some experts recommend “cycling” the bolts several times to improve loading accuracy. Run the bolts down to about 50 percent of their final torque value several times before finally tightening them to their full value.
With racing engines, most racers don’t use head bolts anyway. They all use studs. Studs provide more even clamping than bolts and won’t wear out the threads in the block if the heads have to be removed repeatedly for tear downs and inspections.
Torque Accuracy
Many people never check the accuracy of their torque wrenches. The “old fashioned” deflection beam style torque wrenches are the least expensive wrenches but also the most accurate in terms of holding calibration. Unfortunately, they are also the hardest to read because of the pointer and scale on the handle. Dial torque wrenches are easier to read, but are more expensive and apt to be damaged if dropped. Adjustable torque wrenches that can be preset to “click” or slip when a certain torque value is reached are the easiest to use, but are expensive and need to be recalibrated on a regular basis (every 100 engines or six months, depending on usage).
Installation Tips
1) Make sure all the head bolts are in perfect condition with clean, undamaged threads. Dirty or damaged threads can give false torque readings as well as decrease a bolt’s clamping force by as much as 50 percent! Wire brush all bolt threads, carefully inspect each one, and replace any that are nicked, deformed or worn. If a bolt doesn’t thread into a hole smoothly with finger force alone, there is a problem.
On aftermarket studs or bolts, never use a die to recut the threads. Most have “rolled” threads, which are stronger than standard threads. Use a thread chaser to clean up the threads.
2) Dirty or deformed hole threads in the engine block can reduce clamping force the same as dirty or damaged threads on the bolts. Run a bottoming tap down each bolt hole in the block. The tops of the holes should also be chamfered so the uppermost threads won’t pull above the deck surface when the bolts are tightened. Finally, clean all holes to remove any debris.
If the block deck has been resurfaced and you are using studs rather than head bolts, chamfer the top of each hole
3) For head bolts that screw into blind holes, lightly lubricate the bolt threads as well as the underside of the bolt heads with engine oil. Make sure the bolts do not bottom out or hydrolock because of oil trapped in the blind hole.
For head bolts that extend into a coolant jacket, coat the threads with a flexible sealer. Failure to coat the threads may allow coolant to leak past the bolt.
4) Because TTY head bolts are permanently deformed once they are tightened, they should not be reused. Reusing TTY bolts will cause them to stretch further, which increases the risk of breakage. A stretched bolt also will not hold the same torque load as before, which may cause a loss of clamping force resulting in head gasket leakage.
5) Check bolt lengths. Make sure you have the correct length bolts for the application and for each hole location (some holes require longer or shorter bolts than others). If a bolt is too short and only engages a few threads in the block, it may pull the threads out of the block.
Bolts should also be measured or compared to one another to check for stretch. Any bolt found to be stretched must be replaced because 1) it may be dangerously weak, 2) it won’t hold torque properly, and 3) it may bottom out when installed in a blind hole.
6) When installing head bolts in aluminum cylinder heads, hardened steel washers must be used under the bolt heads to prevent galling of the soft aluminum and to help distribute the load. Make sure the washers are positioned with their rounded or chamfered side up, and that there is no debris or burrs under the washers.
7) Resurfacing a cylinder head decreases its overall height, so be sure to check bolt lengths to make sure they won’t bottom out in blind holes. If a bolt bottoms out, it will apply little or no clamping force on the head, which may allow the gasket to leak.
If a head has been milled and one or more head bolts may be dangerously close to bottoming out, the problem can be corrected by either using hardened steel washers under the bolts to raise them up, or by using a copper head gasket shim in conjunction with the new head gasket to restore proper head height.
8) Always look up the specified tightening sequence and recommended head bolt torque values for an engine before installing the head gasket. Never guess. Complete cylinder head torque specifications for domestic and import vehicles can be found in service manuals and torque tables published by gasket manufacturers.
9) Use an accurate torque wrench to tighten standard type head bolts in 3 to 5 incremental steps following the recommended sequence and torque specs for the application. Tightening the bolts down gradually creates an even clamping force on the gasket and reduces head distortion. It’s a good idea to double check the final torque readings on each head bolt to make sure none have been missed and that the bolts are retaining torque normally.
If a bolt is not coming up to normal torque or is not holding a reading, it means trouble. Either the bolt is stretching or the threads are pulling out of the block.
With TTY head bolts, use a “Torque-To-Angle Indicator” gauge with a torque wrench to achieve proper bolt loading. Don’t guess on the angle. Be exact.
10) If a head gasket requires retorquing (most do not), run the engine until it reaches normal operating temperature (usually 10 to 15 minutes), then shut it off. Retighten each head bolt in the same sequence as before while the engine is still warm. If the engine has an aluminum cylinder head or block, however, don’t retorque the head bolts until the engine has cooled back down to room temperature.
On some applications with retorque style head gaskets, it may be necessary to retorque the head a third time after a specified time or mileage interval due to the design of the engine. Follow the vehicle manufacturer’s recommendations.
More information on engine sealing can be found in the Engine Builders Buyers Guide.
More Most Read Articles…