Engine Builders: One of the great debates in automotive service is oil drain intervals. The correct oil change interval is the one prescribed by the engine manufacturer that can be found in a vehicle owner’s manual. Oil drain interval is determined by the engine type, drive train, vehicle type and expected use. Each OEM tests its own vehicles to determine the proper drain interval.
Some OEM’s may have changed to longer drain recommendations as engines and motor oils are far more advanced over those produced even a few years ago. However, this is not always true, so you should check the owner’s manual for the specific drain interval for every vehicle.
Understanding the type of driving a customer does with their vehicle is also beneficial. Generally speaking, most consumers drive a severe cycle of short trip or stop and go type service and using the severe service drain interval is recommended.
With summer coming and travel increasing, people that use their car, SUV or light duty truck for towing should also follow recommendations for severe service.
There is not a downside to more frequent oil changes. A shorter drain will provide the best defense against harmful engine deposits, better oil consumption control, improved fuel economy and lower wear on engine parts. More frequent oil changes may also help vehicle owners discover a more serious engine problem such as a coolant leak before serious damage occurs.
Engine deposits and wear are slow, sure killers of performance and engine life. In most cases, by the time owners are aware of an issue, the damage has been done and often cannot be reversed without an engine rebuild. Changing the oil in a vehicle at the appropriate drain interval is the easiest, most cost effective insurance against lubricant related engine damage.
Provided by Pennzoil
Engine Builders: The AERA Technical Committee offers the following information regarding a thicker cylinder head gasket for 1985-95 MerCruiser 3.7L engines. This gasket is available only from Mercury Marine and offers additional rebuilding possibilities for this engine.
The part number for the thicker head gasket kit is 27-94954A1 and MerCruiser claims it will reduce the compression ratio on a new engine from 8.8:1 to 8.2:1. Reducing the compression pressure in this engine is good practice as fuel quality seems to be degraded since this engine’s original design.
The ignition timing for these engines was originally set the at 8° BTDC and piston failures in the # 1 and # 4 cylinders were common. AERA Technical Bulletin TB2301 addresses that problem and suggests lowering the amount of advance to 4° BTDC.
MerCruiser refers to the 3.7L engine as 3.7 LX, MIE 470, MCM 470, 485, 488, 165, 170, 180 and 190.
Engine Builders: The AERA Technical Committee offers the following information regarding cylinder head installation for 1998-2003 GM 3.5L VIN H engines. This information should be referenced any time the cylinder heads are installed.
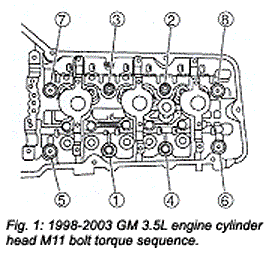
There are three different length bolts used to secure the cylinder head to the engine block for this engine. The M11 bolts should be replaced after only a single use. The other M6 bolts may be re-used, unless damage is evident. Follow the procedure in Figure 1 for correct bolt location and tightening sequence.
Align the cylinder head with the deck face locating pins (left side shown, right side similar).
Place the cylinder head in position on the deck face. Important: DO NOT reuse the old M11 cylinder head bolts.
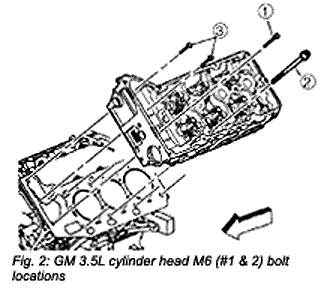
Install new M11 cylinder head bolts and finger tighten (#2 in Figure 2).
Install the M6 cylinder head bolts at the front of the cylinder head. Install the longer M6 cylinder head bolt (#1 in Figure 2) in the outboard location as shown. Install the two shorter M6 cylinder head bolts (#3 in Figure 2) in the locations shown.
Tighten the NEW M11 cylinder head bolts a first pass in sequence to 22 ft.lbs. (40 Nm).
Tighten the M11 cylinder head bolts a second pass in sequence an additional 60°.
Tighten the M11 cylinder head bolts a third pass in sequence an additional 60°.
Tighten the M11 cylinder head bolts a final pass in sequence an additional 80°(total step 6-8 equals 200°)
Tighten the long M6 cylinder head bolt (#1 in Figure 2) to 106 in.lbs. (12 Nm).
Tighten the two shorter M6 cylinder head bolts (#3 in Figure 2) to 106 in.lbs. (12 Nm).


