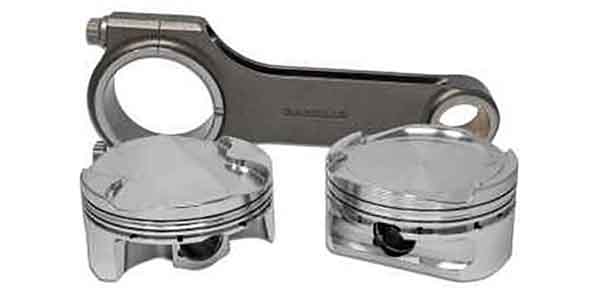
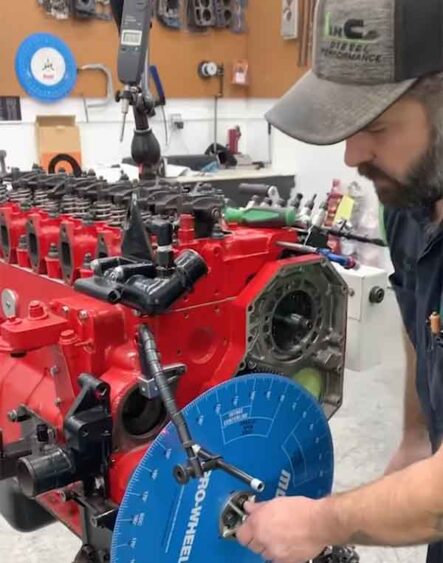
There’s a lot of confusion out there on this topic, so we thought it only right to highlight the correct way. To demonstrate, we’ve got a 12-valve Cummins engine with full height pistons, not reduced height pistons.
First things first, in order to degree a cam or check valve-to-piston clearance there are several tools you have to have. Number one will be a degree wheel and a way to mount it. The larger diameter you get, the more accurate it is. Then, you need a pointer or indicator. Most people use a piece of wire or actually buy a pointer. We use a laser, which works awesome and is very accurate. Next thing is some form of a piston stop. You can rig something up with some flat metal. We like a piston stop that goes all the way across the cylinder and bolts down on both sides because your piston can rock. If you’ve got .006, .007 or .008 piston-to-wall clearance, and you only catch one side with a piston stop, you’ve got a tendency to rock. The more pressure you put on your ratchet as you’re turning, you can change it by a degree or more. By doing the piston stop all the way across, you take the rock out of it.
You can also use the dwell method where you use a dial indicator on the piston up to dwell. You go back X amount of degrees and then you go clockwise past dwell the same amount of degrees and then you average it and split it. Some guys prefer that method, but a good piston stop works great.
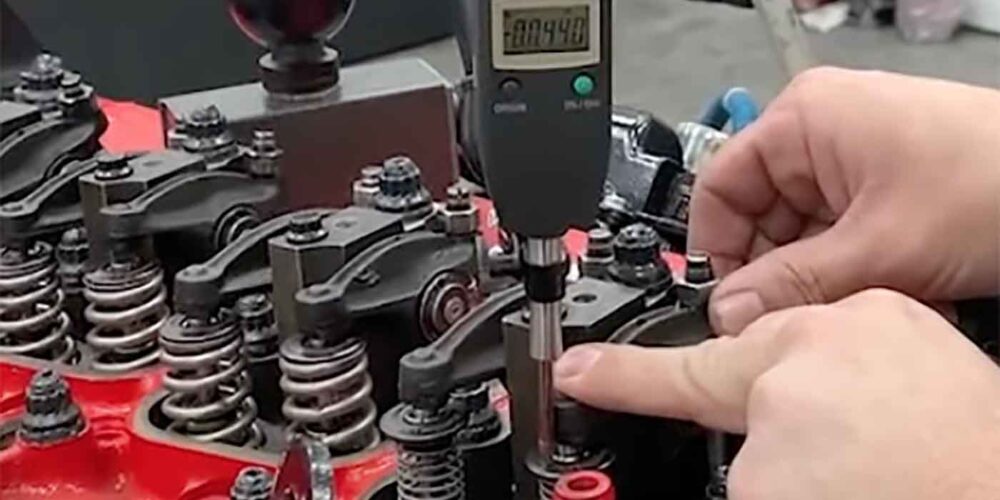
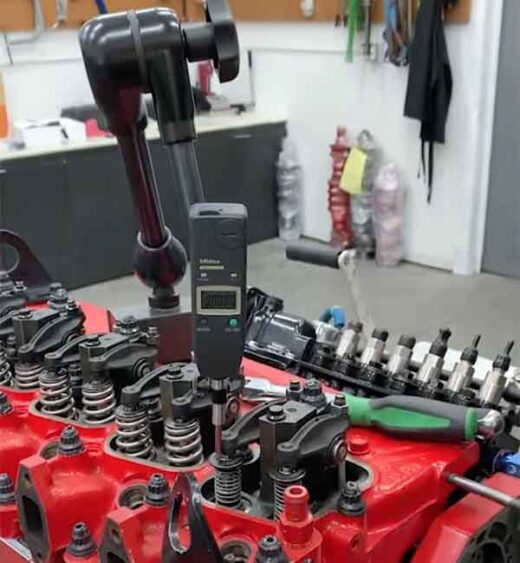
Then, you also need a good dial indicator stand and some way to get down to the lifter. I got a dial indicator extension and then cut the end of a Cummins pushrod to tack on. It goes right into my dial indicator and works great. You’ve just got to make sure that you’re nice and straight within the travel of your tappet or lifter.
Now, we have to locate TDC. It doesn’t matter if you go clockwise or counterclockwise. Turn the engine over until you firmly hit your piston stop and then note the degree wheel. We are just a hair over 7 degrees on our degree wheel. Now we’re going to go the opposite direction of travel. We’re going to bring that piston up until it hits our piston stop and note the position. Again, we are just a hair over 7 degrees.
Now, I’m going to roll this back over and remove our piston stop because we have our degree wheel set. What you’re doing there is coming up both directions and hitting your piston stop and then you would move your pointer and keep checking it so you’re the same before and after TDC on each side. Then, you remove it, and at zero degrees, that’s true TDC.
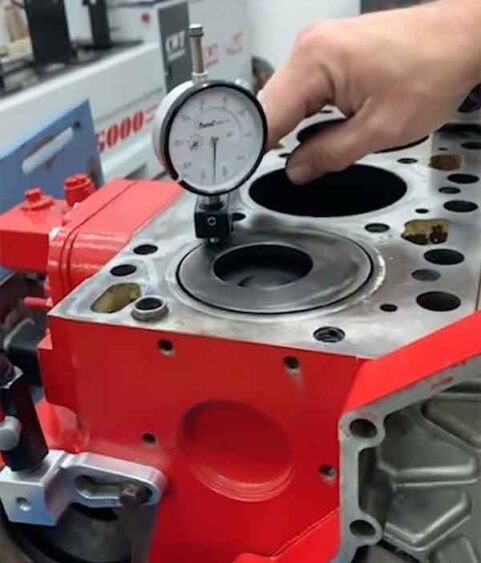
It’s also good to note piston protrusion when you’re checking valve-to-piston, especially if it’s a combination you may or may not do again or if you’re putting a lot the same engines together, you always want to note protrusion. We use a sleeve height gauge to do that. Protrusion isn’t necessary for degreeing a camshaft, but it is good to note for other builds.
Now, we’re going to roll this up until we’re on zero degrees and then we’re going to check protrusion. You want to make sure going off the deck that it’s zero. I always check it in multiple places. Measure your piston protrusion and then document that for later use.
A lot of cam manufacturers will give you this information. If you have no more than .025” piston protrusion and at least .055” valve face depth or valve recession, then a 188/220 cam or 170/208 cam is a drop-in. That’s why it’s important to check protrusion.
Valve recession is very critical to valve-to-piston clearance. We do a minimum of .055” on our 12-valves. We try to get all of them right at .055”, but a minimum of .055”. If you’re off just a couple thousandths, you’re good to go. But, if you’re further off, you might have some issues.
It’s good to document and note that if you don’t have the recommendation by your cam manufacturer on valve face depth and you need to cut the seats or grind the valves and get it fixed. Make sure it’s addressed.
Going back to TDC – we’ve located everything with our degree wheel, so we’re ready to start measuring. One important thing before you zero your indicator is to make sure you’re on the backside of the valve and not on the exhaust stroke. The most important thing is getting set up nice and true with the travel of the lifter, so that your indicator doesn’t stick at any point and not come down and give you an inaccurate reading on the backside. Also, you have to make sure you have plenty of travel once you mount it. You want at least .300” of upward travel. I always like to lift it up and let it down and see if it naturally goes back into the cup of the tappet or lifter.
One thing to note is there are two different methods for checking cam timing or degreeing your camshaft. The one you hear most commonly is center line. Center line is easiest to check and it’s easiest to relate to people and give a number. The more accurate measurement is checking cam timing by intake opening and intake close at .050. You can check exhaust too, but as long as the cam was ground right, if the intake is on the exhaust is going to be on. We check both center line and cam timing.
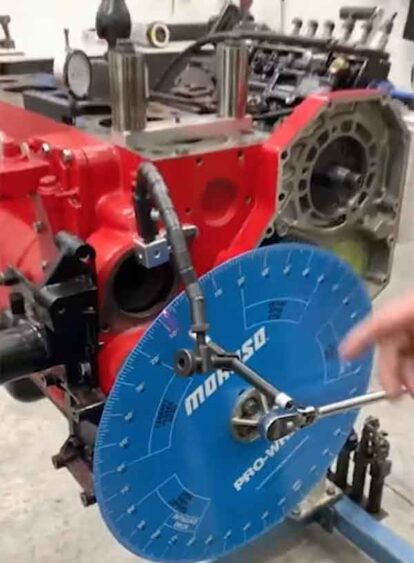
Now, to degree the cam, we’re on zero on our indicator and we’re going to come up on intake opening, so we’re going to turn the degree wheel very slowly until we hit .050 opening. Record your degree wheel measurement. Be sure to come up nice and slow. If you go past it, you’ve got to go back at least 30 degrees to take the gear lash out. The longer the ratchet, the more accurate and easier it is to control.
When dead on at .050, our setup is at 4 degrees on our intake opening. We’re 4 degrees before TDC, so -4. Now, we’re going to measure and verify max lift compared to our cam card. We’re going to go past max lift to .050 before closing. Doing that, we get .307 max lift, and on the degree wheel, which is marked for valve timing, we are at 13 degrees.
On the cam card Hamilton provided with the 188/220 cam, intake timing is -5, so 5 before and 13 on closing with a 99-degree center line. I’ve got -4 and 13, so we’re matching on our closing, but we’re showing a degree early on our opening. It’s not uncommon to be a couple thousandths off. We’re very close to our cam card.
Now, we’re going to check our center line and see where we’re at. To check center line, you go to max lift, you zero your indicator, roll your engine counterclockwise backwards until your indicator goes down at least .100. Then, you’re coming back to .050 before max lift. The reason you go backwards at least .100 again is to get the lash out. Note your reading on your degree wheel, then go to max lift at .050 on the backside of the lobe. Document that reading, add them together, divide it by two, and that’s your center line.
For a lot of people, center line is not a very accurate method. That’s why we check both ways – the cam card for opening and closing and center line – but center line gets you in the ballpark. Checking our center line we got 58 and 137.5 on the degree wheel. Doing the calculation 58 + 137.5 divided by 2 = 98. Our center line is one degree advanced from the cam card. Being within a degree on the average build is fine as long as your valve-to-piston clearance is okay.
When you’re degreeing a cam, advancing a camshaft will bring your power band down and retarding your cam timing will bring your power band up in rpm. For the average guy, a 188/220 cam is a pretty large camshaft. You want a large cam on a 12-valve because they need all the help they can get flowing air. By advancing that big cam that one degree you’re probably realistically not going to notice a difference, but on a dyno you would see your power band move down a little bit. That’s what most people are going to want. At 98 degrees, we’re going to stick with that and we’re going to check our valve-to-piston to make sure it’s good.
You might think you don’t need to care about degreeing the cam, and want to just check valve-to-piston. But, in order to check valve-to-piston, you have to properly locate TDC and you’ve got to have a degree wheel. We check this stuff on every engine we build.
Something else to keep in mind is head gasket thickness. Most people on a 12-valve just automatically go to a .020” over head gasket. If you have a .020” over head gasket and your protrusion on this 12-valve was .025” or less, then you wouldn’t necessarily have to have .055” on your valve recession. There’s a lot of factors that go into it, which is why it’s good to keep notes.
For checking valve-to-piston clearance, typically, you just set up the valvetrain on cylinder number 1. We use test springs to make this more accurate. However, you can check valve-to-piston with the springs you’re using, but you will have to turn your adjuster screw and be careful because you can get pushrod deflection and get a false reading.
For valve-to-piston, you want to start off with TDC on compression stroke. We’re on the backside of the cam and we can get our lash adjusted. Where a lot of people go wrong is they set their lash and that’s how they check valve-to-piston. But, you’ve got to remember the reason you have lash is to compensate for the valves growing for heat. Ideally, you’re going to have little to no lash. It’s very important to check valve-to-piston with zero lash or close to it. We normally do .005-.002, something measurable to know you have lash and that’s pretty realistic.
Starting at TDC on compression, you can roll the engine over if you’re not sure and make sure that neither one of your pushrods are moving and neither valves are trying to open to verify that you are on compression. You can check intake or exhaust first. I always check intake first because that way I’m set up near my exhaust valve. That’s where you’re checking valve-to-piston first. Make sure the lash is out of it and zero your indicator. Then, we want to rock it to get your reading.
Move over to your exhaust. Always make sure you have it preloaded plenty and that you have travel. We’re now going to zero out our indicator at .002 lash and roll the engine over clockwise to 10 degrees before TDC.
We’re going to come up on the exhaust stroke and catch the exhaust valve as its closing and the piston coming up to TDC. If you pass it up, you’ve got to go back at least 30 degrees, so take your time. We’re at 10 degrees before TDC and this is where we’re going to check our exhaust. I always set up on the retainer. You’ve got to keep in mind your rocker arm is moving, so I like to set up on the retainer. Make sure you give it plenty of travel so you don’t run out and get a false reading. Zero the indicator, push the valve open and we have .050. For most people, the minimum you want is .050. This is a 188/220 cam. You expect it to be pretty tight and right at .050, so the exhaust is good.
We usually check this at 10 and 5 degrees, and a lot of times, I’ll even check TDC on intake and exhaust. That’ll give you a little more broad of a range, especially if you’re playing with the cam. But, the rule of thumb is 10 degrees before and 10 degrees after.
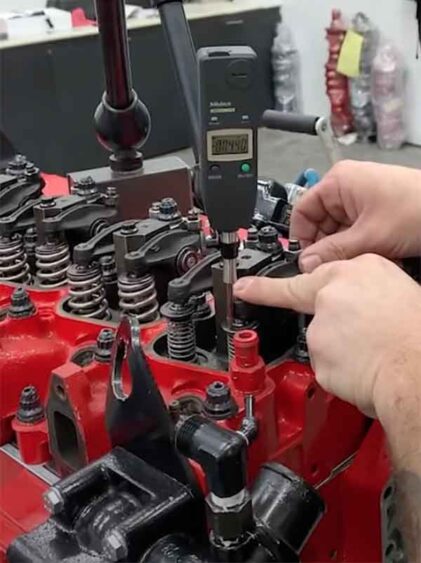
Now, we’re going to move our engine to 10 degrees after TDC and set up on our intake valve.
Zero your indicator, and we have .044, which is a little tight. We’d like to see .050. However, it’s not uncommon at all to adjust your lash according to your build, to your clearance, to the usage of the engine and where you want your power. Don’t be afraid to cater your lash to your needs – a couple thousandths is fine.
For us, it took a lot of playing around with this cam to get our clearance dialed in, so it’s extremely important to not only degree the cam, but check your clearance.