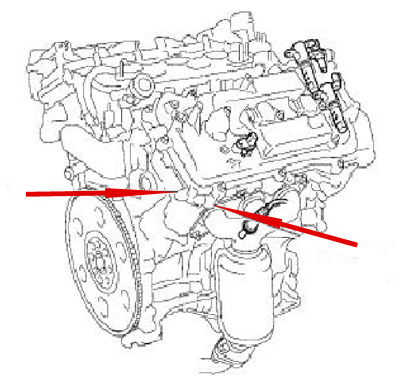
Engine Builders: The AERA Technical Committee offers the following information regarding an engine oil leak for 2005-2007 Toyota 3.5L 2GRFE engines. Some 2GRFE engines may display evidence of a small oil leak, located on the rear side of Bank 1.
The source has been identified as unused side and end bolt holes in the right hand (Bank 1) cam housing cover. A repair procedure has been developed to correct this condition to utilize those bolt hole locations.
To repair this leak condition, obtain two p/n 90080-11344 bolts with washers from Toyota. An oil resistant anaerobic adhesive sealant, such as Three Bond 1363A (or equivalent), must also be used. Follow the two steps below to complete the repair.
Clean the affected area using a degreaser or other approved cleaner.
Coat the threads of the bolts with an oil-resistant anaerobic adhesive.
Install the bolts (p/n 90080-11344) into the side and end bolt holes and torque to 88 in.lbs. (7.3 ft.lbs.) (10 Nm).
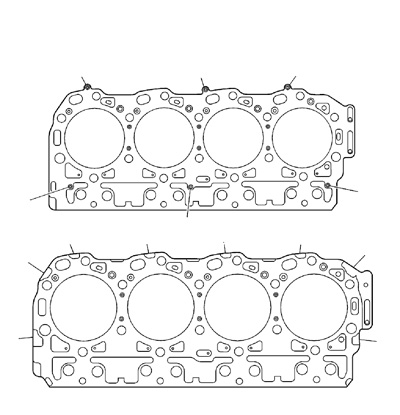
Engine Builders: The AERA Technical Committee offers the following information regarding a head gasket design change on 2001-’06 GM 6.6L Duramax diesel engines. Special surface cleaning procedures must be followed to allow a proper seal when using the new design head gaskets along with a change in the torque angle specification.
A mid-year design change was made to the head gasket of the 2006 Duramax diesel engine. This second generation head gasket will service all 2001-’06 vehicles, including those that were built with the first generation head gaskets. The second generation head gasket does require a lower head bolt torque angle specification as well as special cleaning methods of the gasket surface.
The second generation gasket can be visually identified by its riveted construction as opposed to the crimped design of the first generation gasket.
For vehicles that were equipped with the first generation head gasket, special attention must be given to the cleaning of the engine block and head gasket surfaces when the second generation head gasket is to be used. Over time, the crimped areas of the first generation gasket may allow corrosion build-up where they contact the block and head surface areas.
Inspect the gasket sealing surface for corrosion, especially in the areas that were in contact with the crimped tabs of the first generation head gasket. For surfaces that have corrosion or pitting in them, wrap a piece of flat steel with #600 grit wet grade sandpaper. Use a moisture displacing lubricant (p/n 1052864 USA, p/n 89020803 Canada) or equivalent to wet sand the block surface to remove any remaining gasket material or corrosion. Do not use any paper coarser than #600 grit.
Take care to keep the sanding block parallel to the block surface and evenly sand the sealing surface. Some areas of corrosion will still show a stain. Do not attempt to wet sand these areas down to a shiny metal surface. Change sandpaper as necessary, and clean surface with brake parts cleaner along with the head bolt holes and cylinder bores.
The second generation head gasket requires a lower torque angle specification for the M12 bolts. The M8 bolt torque remains the same. M12 bolts should be torqued to the following specifications:
Step 1) 37 ft.lbs.
Step 2) 59 ft.lbs.
Step 3) 60°
Step 3) 60°
M8 Bolts should be torqued to 18 ft.lbs.