Scat Crankshafts has determined that 99 percent of the time it is the parts that are being used in conjunction with the crank and the additional machining done to the parts that are being used with the crank that are mostly responsible for crank breakage, NOT the crank.
1. IMPROPER MACHINED CRANK GEARS
• Champher machined at wrong angle. See Figure 1.
• Champher machined with too small an angle. See Figure 1.
• Belt drive gears. The seal sleeve bottoms to the face of the main before the inner face of the gear bottoms against the step in the nose of the crank. All of the above prevents the crank gear from bottoming against the step on the nose of the crank. This leaves a gap between the gear and the step, which allows the crank to flex. A fatigue crack starts – SNAP! The crank breaks. See Figure 1.
2. DAMPERS WITH MOVING INERTIA WEIGHTS
Fluid, balls, springs, inertia rings with rubber O-Rings, etc, can you balance a wheel on your race car if the tires are flat? How can your rotating assembly be balanced if to quote one manufacturer: "These units (Dampers) should not be on the crank for balancing as the inertia weight may not be centered until the engine starts." Centrifugal force will always take the inertia weight off center no matter what rpm. Your assembly is never balanced. Metal transferred on nose outside diameter and damper internal diameter will fatigue and start to crack, resulting in a broken crank.
3. EXTERNAL BALANCE vs. RPM
Rotating weight multiplies as rpm increases. Engines have heavier or lighter balance weights and larger or smaller noses. RPM above 5,500 is more risky on a Small Block Chevy than a Big Block Chevy. However, as rpms go up, the weight will try to leave the crank due to centrifugal force. Do not be surprised if at some point fatigue sets in and the nose comes off.
4. DRIVES EXTENDING BEYOND THE NORMAL DISTANCE ON THE NOSE
Multi-stage oil pumps, blowers, etc all have belt drives that require torque taking off at 90 degress to center line of the crank. More torque is necessary for driving these things and further away from main bearing support all leads to multiple of leverage wiggling the nose. Fatigue sets in, nose breaks, blower stops. The Small Block Chevy has the smallest diameter nose and the weakest of all. Note: Blowers take substantially more 90 degree torque than dry sump pumps, therefore, more likely to break noses. Not recommended for Small Block Chevy. If a blower is being used, use a crank with a Big Block nose.
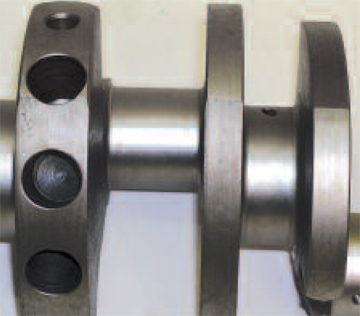
5. IMPROPER BALANCING TECHNIQUE
The counterweights on a crankshaft are designed to work all together as a system within a certain bob weight range. To correct the balance on a crank where the counterweights are too heavy the following should be followed:
Internal Balance: If more than 2 holes are required in each end, the outer diameter of all the counter weights should be turned in a lathe to correct the out of balance condition in all the counterweights. If you try to drill more holes, you will create a secondary wave which will lead to crank flex and eventually a fatigue crank. See Figure 2.
External Balance: The crank is spun with the external balance and flywheel. If it is determined that the assembly is too heavy where the weight is on the damper and flywheel, do not make the correction on the end counterweights of the crank. The out of balance condition is in the damper and flywheel, which is where it should be corrected. It is very simple to alter the bolt on weight of the damper and drill the balance weight on the flywheel. If these components need to be replaced simply bolt on the proper weight to the damper and match balance the flywheel which has to be balanced anyway. If you correct in the end counterweights, you will create a wave in the crank which will wiggle the nose of the crank which well eventually start a fatigue crack which will snap the crank.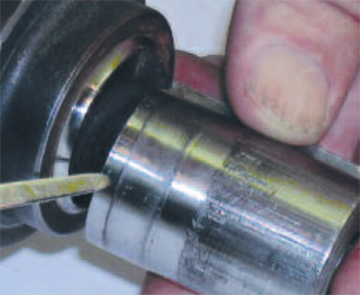
– Tech Tip courtesy of Scat


