Engine Builders: The AERA Technical Committee offers the following information concerning pinless intake valve yokes for Mack E-Tech diesel engines.
Beginning March 2, 2000 (engine s/n 0D0120), pinless valve yokes p/n 891gc328 were phased into production of all E-Tech engines. The pinless yokes are used for the inlet valves only. This change went into effect with cylinder head p/n 732GB5359M, and cylinder head assembly p/n 732GB3491M when yoke guide pins at the inlet valve locations were eliminated.
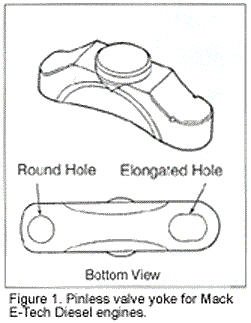
The pinless yoke (Figure 1) is self-leveling in operation and does not have a yoke leveling adjustment screw. Inlet valve lash adjustments are performed in the normal manner with the rocker arm adjusting screw. For all exhaust valve locations, it is still necessary to adjust the valve yoke first, then the rocker arm lash.
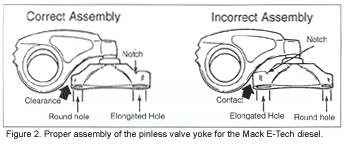
The bottom of the valve yoke that bridges the two inlet valves has a round hole and an elongated hole that fit over the valve stems. The nose of the yoke with the elongated hole has two notches in the casting. When installing the pinless yokes, it is important that the end of the yoke with the two notches faces away from the valves rocker shaft. If the yoke is installed incorrectly, the yoke will contact the rocker arm (See Figure 2).
Engine Builders: AERA members have reported an engine oil gallery leak on 1998-2002 Chrysler 2.7L VIN R engines coming from the gallery plugs located throughout the cylinder head.
Each cylinder head has 6 external oil gallery cup plugs located throughout the head. Locate the cup plug that has the external leak by visually examining the plugs or, if necessary, performing an engine oil dye leak test.
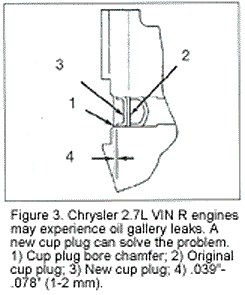
It is not necessary to remove the cylinder head to fix an oil leak and the original cup plug does not need to be removed to install a new plug. The bore for the cup plug is deep enough that you can drive in the replacement plug. To see if this repair procedure has already been done, check for the cup flange to be just inside the chamfered edge of the cup plug bore about .039˝-.078˝ (1-2 mm). If there is already a second plug in the head, removal of the head must be done.
To install the cup plug, clean the cup plug bore solvent and compressed air, lightly coat the new cup plug with sealer, p/n 04318083 or equivalent, and drive the cup plug in the head until it is just about .039˝-.078˝ (1-2 mm) inside the chamfered edge of the bore as shown in Figure 3. Allow the sealant to cure for at least 20 minutes.


