Timing chain installation procedures on 1998-2002 Chrysler 2.7L DOHC Engines - Engine Builder Magazine

Timing chain installation procedures on 1998-2002 Chrysler 2.7L DOHC Engines

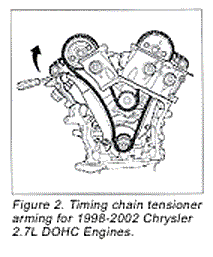
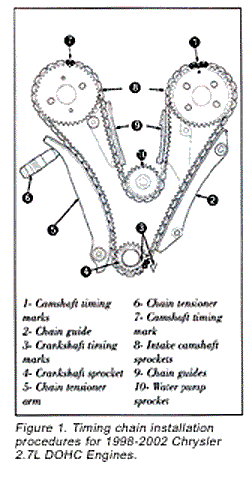
Engine Builders: The following information may be helpful for your installers regarding timing chain installation procedures on 1998-2002 Chrysler 2.7L DOHC Engines. If the following procedure is not followed correctly, upon start up, valves will bend.

  1. Align crankshaft sprocket timing mark to the mark on oil pump housing. NOTE: Lubricate timing chain and guides with engine oil before installation.
  2. Place left side primary chain sprocket onto the chain so that the timing mark is located in-between the two plated links on chain.
  3. Lower the primary chain with left side sprocket through the left cylinder head opening. NOTE: The camshaft sprockets can be allowed to float on the camshaft hub during installation.
  4. Loosely position left side camshaft sprocket over camshaft hub.
  5. Align plated link to the crankshaft sprocket timing mark.
  6. Position primary chain onto water pump drive sprocket.
  7. Align right camshaft sprocket timing mark to plated link on timing chain and loosely position over camshaft hub.
  8. Verify that all plated links are properly aligned to timing marks on all sprockets.
  9. Install left lower chain guide and tensioner arm. Tighten attaching bolts to 28 Nm (250 inch lbs.).

    NOTE: Inspect oil ring on chain guide access plug before installing. Replace O-ring as necessary.

  10. Install chain guide access plug to left cylinder head. Tighten plug to 20 Nm (15 ft. lbs.).
  11. For depressing the timing chain tensioner, refer to AERA TB 1709.
  12. Install chain tensioner into the right cylinder head.
  13. Starting at the right cylinder bank, insert a 3/8˝ square drive extension with a breaker bar into intake camshaft drive hub. Rotate camshaft until the camshaft hub aligns to the camshaft sprocket and damper attaching holes. Install the sprocket attaching bolts and tighten to 28Nm (250 inch lbs.).
  14. Turn the left side camshaft by inserting a 3/8˝ square drive extension with a breaker bar into intake camshaft drive hub and rotate camshaft until the sprocket attaching bolts can be installed. Tighten sprocket bolts to 28 Nm (250 inch lbs.).
  15. Rotate engine slightly clockwise to remove timing chain slack, if necessary.
For information on receiving all of AERA

You May Also Like

Choosing the Correct Block for Your LS Engine Build

Whether you’re scouring junkyards, ordering cores, investigating factory options, looking at aftermarket cast iron or aluminum blocks, or spending big bucks on billet LS blocks, you’ve probably noticed it’s been harder to find exactly what you want for the foundation of your LS build than it historically has.

Has it become more difficult?

As we’ve often written about in the pages of Engine Builder, and certainly in recent LS-focused issues, the LS engine family is still a hot commodity. The reasons are many and those reasons are valid. However, as that popularity has remained high from more and more people seeking an LS engine build or doing an LS swap or boosting a junkyard find, the availability of LS blocks are taking a hit. The result has been higher prices in some cases and longer waits in others, leaving people with a more difficult choice.

Open Loop/Closed Loop and Learning

Closed-loop control can be programmed to either add or subtract up to a certain percentage of fuel in order for the engine to reach the target air/fuel ratio.

Shop Solutions January 2023

Next time you have set of large journal small block Chevy connecting rods to resize, consider honing the big ends of them for a +.002” outside diameter bearing that the LS engines with fracture cap rods use.

Shop Solutions December 2022

Everyone misses occasionally, and this helps avoid dents and damage.

Jesel Certified Performance Rebuilds

Engine components are serious investments for any racer and maintaining that investment could be the difference between winning a championship and losing it.

Other Posts

Going the Extra Mile with Cylinder Head Porting

It’s not just the port work alone that creates spectacular cylinder head performance. The most critical areas of a cylinder head are those which pass the most air at the highest speed and for the longest duration. Your bowl area, the valve job, the throat diameter, and combustion chamber are all crucial parts. 

Tight Tolerances and Building Power

As you ascend Mt. Everest, you reach an area called the death zone. Once you climb high enough, the margin of error becomes perilously thin. That death zone also applies to engines. As the horsepower per cubic inch and rpm increase, the margin of error decreases. 

CNC Update: Features and Automation

Precision is key when it comes to automotive parts; the complex designs of connecting rods, pistons and rings, blocks, cylinder heads, and other parts require super tight tolerances that are getting more and more difficult to be met by hand or with other machining processes outside of CNC.

All Things Media Blasting

Engine building is a segment of the automotive industry that has always been ahead of the curve in media blasting, and no matter the engine shop, cleaning equipment is a common bond.