I have spent the majority of my career working on 360 and 305 sprint car engines. In 2017, Salina Engine owner Tod Roberg approached me about coming to work for the Salina, KS-based engine machine shop.
Salina Engine was founded in the 1960s by Russell Roberg as Salina Engine Supply. Russell continued to grow the machine shop, and built a successful parts supply store in the Salina, KS area. Throughout the ‘80s ‘90s and 2000s, the business was ran by Russell’s children, with his son Tod acting as president of the company.
Salina Engine’s primary focus is on racing engines, with its main market being sprint car engines for various sanctioning bodies. Along with the sprint car program, the shop also does dirt modified, dirt late model, dirt stock car, and NHRA Super Class engines.
Our signature look is to paint our blocks gray and have black external pieces on our engines. We operate out of a 12,500 sq.-ft. building, which consists of a front office area, parts and storage area, machining area, two assembly rooms, a break room, dyno room, and tear down area.
Recently, we built one of our base ASCS 360 Sprint Car engine packages. This engine was for a repeat customer who has had an engine built with us before.
The Engine Build
Our base ASCS 360 engine build begins with initially ordering our pistons and connecting rods to get a bob weight to order a crankshaft. Crankshaft availability varies depending upon the time of year, and can be as far out as eight weeks. We also order our fuel injection system at the same time as those are custom built to our exact specifications, and can be as far out as seven weeks.
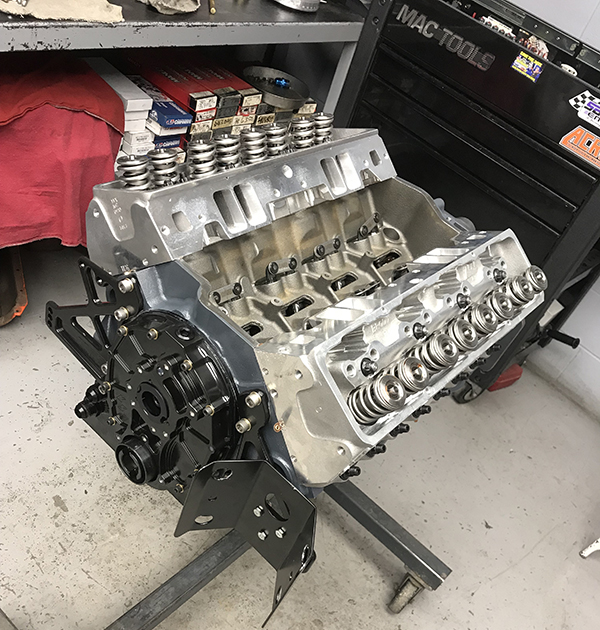
The first machining operations done in-house are modifying the main housing bore for piston wrist pin oiler jets. After we perform this modification, we brush the mains in our line hone to ensure no burs are present from the oiler modifications. Next, we torque plate hone the block to our specified clearance to the piston skirts. We use our profilometer on each block to maintain proper cylinder finish for ring seal and longevity.
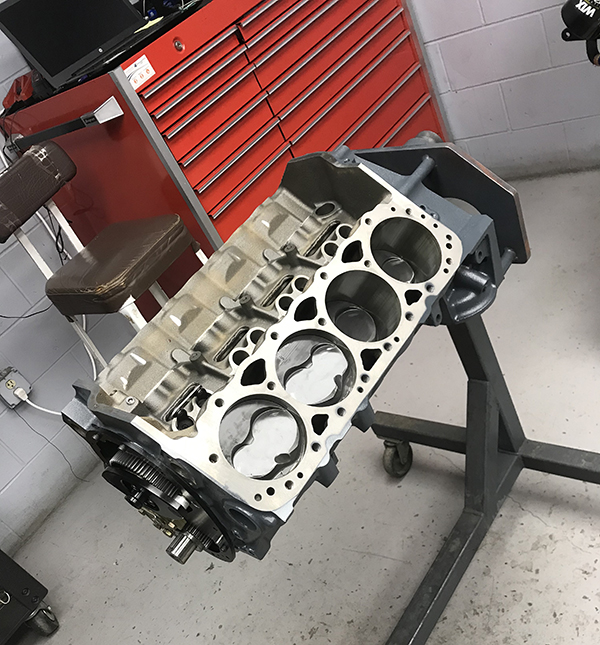
Following the hone, we mock up the entire rotating assembly to check for any rotating assembly clearance issues and measure the piston deck height prior to surfacing the block. The block is then surfaced to allow for the piston to be a proper height below the bore to achieve our desired quench. All oil passages are checked for proper galley plug engagement, and several other areas are tapped for plugs, including the mechanical fuel pump boss.
For our injection manifold, we choose to drill and tap two 10-24 threads on the block common wall to attach our injections center valley plate. We final clean our block and prep the cylinders with Total Seal quick seat and Total Seal assembly lube.
The crankshaft balance is checked in-house after rough balancing is performed by the manufacturer. Following balancing we check our rod and main bearing clearance. This particular combination uses 2.448˝ main journals, and 2.00˝ rod journals. On every build, we verify bearing clearance and have a range we consider to be acceptable. Our ring end gaps are file fit, and being that these combinations run on methanol, we tend to skew toward the lower side of the tolerance on clearance to attempt to further reduce blow by.
Once all the rotating assembly tolerances are checked, we assemble the short block and degree the camshaft. Camshaft duration and timing will vary depending on the tracks the customer primarily tends to run, as well as the rest of the engine combination. We find that duration figures between 255 and 265 works well for most customers. On this build we are using an anchored Idler gear drive, common place on most Sprint Car builds.
Next, we begin focusing on the cylinder heads. We have some specific modifications we perform on every ASCS engine to help aid in cooling and water flow. We also verify the valve guide clearance. Typically we are on the high side of what most shops consider acceptable, but have found a bit extra clearance to not cause any noticeable issues, which reduces the likelihood of valve stem galling. After these are done, we check concentricity of each valve job. Typically on newly CNC’d heads we have the porting company do the valve job to their specs.
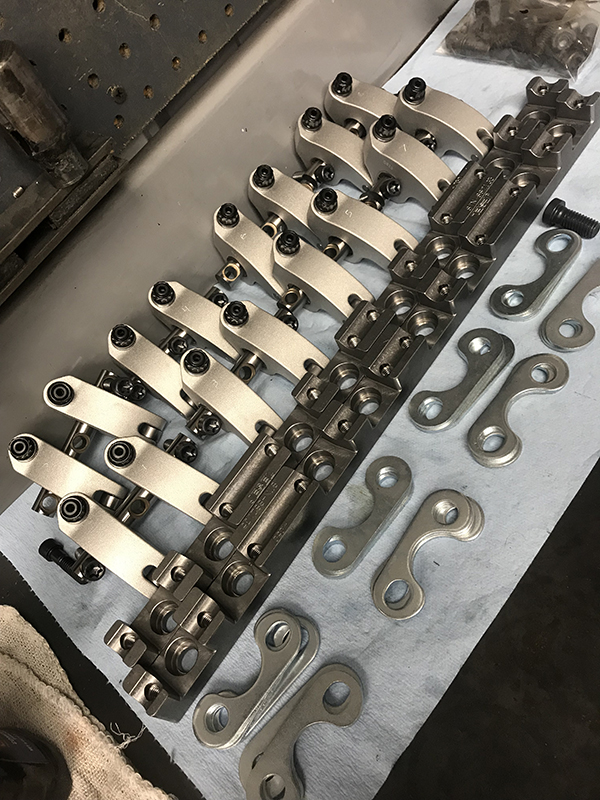
Once the cylinder head is clean, we begin setting up our rocker arm geometry for our valvetrain. We use the stand height setting tools as a baseline, but final height is determined by sweep pattern. We tend to set our valvetrain up so the rocker stand is in a position to allow the majority of the sweep across the tip to take place early in the lift cycle when spring pressure is lower, and when pressure is higher, the rocker arm is pressing more straight down on the tip of the valve rather than across it.
With proper geometry set, we check piston-to-dome clearance with clay. Typically, we find on most shelf pistons like this engine uses, that mild material removal is necessary around the spark plug area. We do this by grinding a small portion of the combustion chamber. With dome clearance verified, we begin checking piston to valve clearance. Our first step is to verify radial clearance. We allow a minimum of .060˝ on the intake side, and .080˝ on the exhaust side. As for the vertical clearance, we find that similar numbers are acceptable, but typically are able to achieve an acceptable combustion chamber volume without having to run the clearance that close.
We find these 360 Sprint Car engines need a minimum of 14.5:1 compression to be at the power level we consider acceptable. Being fueled by methanol, they can tolerate higher, but we seem to find a diminishing return going too far passed this mark.
We now prep our heads for complete assembly. Typically, we run a traditional dual spring with dampener on this application. We have experimented with various different designs, but seem to have the best longevity, and least amount of visual issues with dampener style springs on Sprint Car engines. Our base package builds use custom titanium intake valves, and small stem stainless steel exhaust valves. The reduced stem diameter on the exhausts brings their weight down to nearly the same as the titanium intakes. This ensures the valvetrain will be able to maintain control of the exhaust portion of the system. Prior to putting the springs on, we coat the retainers in cmd paste and put light oil on the valve locks.
With the cylinder heads assembled, we put them on next to get measurements for pushrod length. Knowing this length, we get our pushrods ordered, and this will typically be the last item we wait on to take the engine to the dyno.
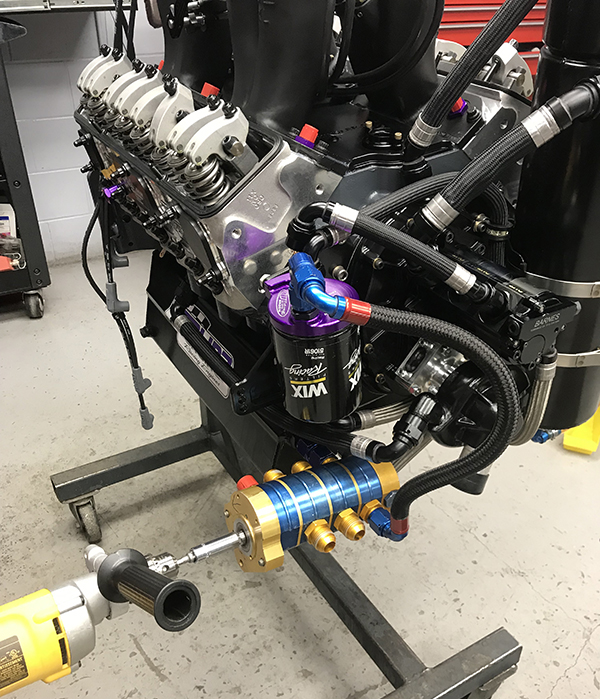
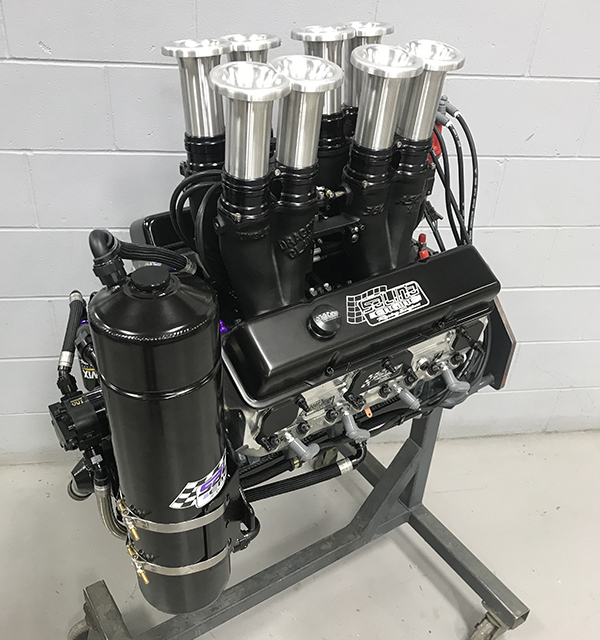
From here we put the front cover on. Most Sprint Car applications use a direct drive oil pump from the camshaft and a water pump driven directly off the crankshaft. Because of this, our cover has provisions for mounting both pumps. For our base package we use a three-stage dry sump pump. We have found that the two scavenge stages are adequate to maintain a sufficient volume of oil in the dry sump tank, and help us to reduce the cost of the complete package.
With the water pump and oil pump mounted, and the oil pan in place we begin to plumb our cooling and oiling system. We use convoluted hose and crimp-style hose ends on these builds. We have a hose crimper and keep an inventory of fittings to be able to do the plumbing start to finish in-house.
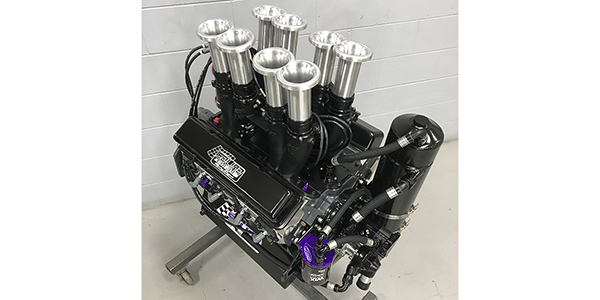
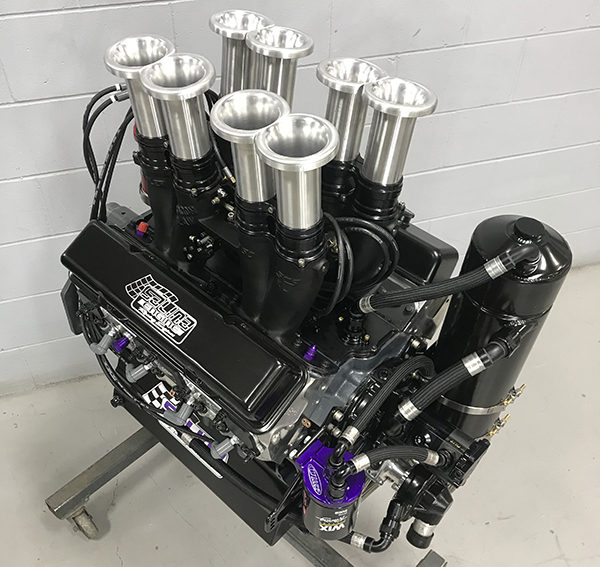
One of the final pieces to go on our build is the IR runner manifold. These are very intricate pieces and require a good deal of attention to detail to perform well on the racetrack. The design we use is a three-piece with two runners, which bolt to the cylinder heads and a valley plate, which bolts between the runners.

Once the manifold is in place, a good deal of attention is paid to the butterflies and linkage. It is absolutely critical that the butterflies be set to the same clearance on both sides and that the linkage is timed to open both sides evenly. If one side of the manifold is open more at idle, the motor will tend to have a lazy sound, as one side of the motor is over fueled compared to the other. Also, if the linkage is opening one side of the manifold faster than the other, it will cause that bank of the motor to accelerate or decelerate at a different pace than the other. Typically, this will become evident in starts and restarts as the motor won’t accelerate cleanly. Another sign of unevenness is as the driver lifts the throttle to go into the corner, flames may show from the headers on one side of the motor or the other.
Along with controlling the butterflies, our IR system is also responsible for maintaining fuel flow to the engine. Sprint Car engines use constant flow injection, which relies on a metered spool known as a barrel valve to deliver appropriate fuel to the engine based upon where the butterfly is in relation to the spool. This relationship is set with a leak down gauge. We find on most engines between 18% and 24% works well. The barrel valve then delivers fuel to the nozzles, which are precision drilled to specific sizes to maintain fuel lbs./hr. to each cylinder.
With the engine fully assembled and prior to our dyno test, we put a small amount of air pressure to the crankcase and check for leaks with soapy water. We find that between 2 and 4 psi is more than adequate to locate any issues. Next we add oil, and using an old, dry sump pump attached to our oil pan, we prime the engine.
From here, we go to our dyno to finish the engine. One step we always do on Sprint Car engines is put a sight tube on our oil tank. This allows us to ensure the scavenge sections are maintaining oil level in the tank while the engine is running. We have found that some older pumps have difficulty keeping an adequate level of oil within the tank. We also verify our injection side-to-side has been set correctly using an air flow meter pressed into each runner at various throttle positions.
The Parts List
Our base ASCS 360 builds begin with a Dart SHP Pro block. We like this combination because it is lightweight, and has an enlarged camshaft core, and .904˝ lifters. It also uses splayed steel main caps to withstand the rigors of sprint car racing.
For this particular build we used a Callies midweight crankshaft. We have found that this is a good compromise between cost, weight and durability.
All our 360 and 410 Sprint Car builds use Dyers connecting rods. We used Mahle Pro Series pistons. We like the Mahle piston for the fact that it is very well engineered, and they have availability. This allows us to not have to keep an inventory of custom pistons of various bore sizes in stock.
For rings we use Total Seal. They have been a great company to work with, and any time we want to try something different in our ring package, they have what we are looking for.
We use King rod and main bearings. For our Sprint Car builds we use the XP series bearing. These have proven durable and are typically closer to the clearance spec we need with a standard bearing. At times we will split the bearing sets between std and x to add additional clearance.
Our gear drive on this build is one from Allstar Performance. Our Roller lifters are from Crower. We only use lifters with pressurized oiling to the roller axle. We have found that this greatly improves roller life. We also typically use the standard seat height lifter to reduce side loading on the lifter body.
For pushrods we use Trend Performance. They have a great program with their quick ship option, and very rarely do they not have the length in stock we need. For our build we used 7/16 .165˝ wall pushrods.
Our rocker system is a Jesel Sportsman. The cylinder heads are Brodix ASCS spec. We had this set prepped by 1 Way Technologies in Indiana.
Valves on this build are custom pieces from Victory 1 Performance. Springs, retainers, locators, and keepers are all from PAC.
Our base 360 build uses a Barnes Systems dry sump pump. All plumbing is handled by Earl’s Ultra Pro Hose and Fittings. KSE handles the timing cover and water pump, and we use Dan Olson oil pans.
Saldana Racing Products did this custom internally vented tank for us. This allows us to keep the top end of the engine clean and free of any oil mist.
MSD handles our ignition needs, and we use on the base build an out-of-the-box Pro Mag 12 lt, which was purpose designed for Sprint Car racing.
Our first choice for all our IR manifold needs is Kinsler Fuel Injection. We chose one of their Dragon Claw model manifolds for this build.
The Performance Numbers
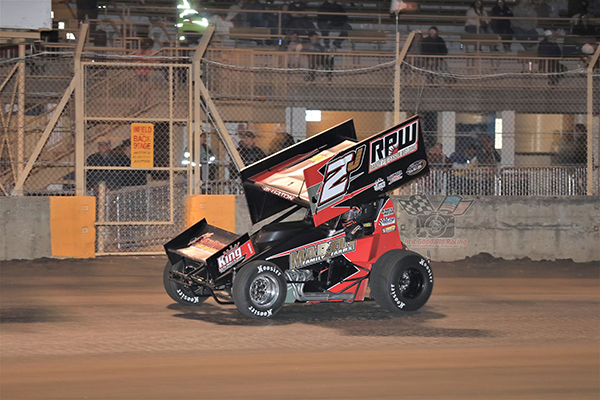
Our base 360s currently put out horsepower numbers above 700 and torque numbers just shy of 600. On most racetracks with these cars, this power is more than capable of achieving 120+ mph.
The intent of our base package was to attempt to curb the cost of 360 Sprint Car engines. Most high end 360’s range anywhere from $45,000 to $55,000 for a complete new engine. With our base package, we were able to get this price down to $35,000 and still have a reliable, lightweight and powerful combination. We offer packages with price points above this, and for professional race teams, we suggest those higher packages, but this package will compete on most dirt track surfaces right along side the higher priced offerings.


